Pages

Friday, 28 June 2013

Water in wood, drying wood

To follow on from the last post about how wood shrinks, I was making some needle cases from elm branch wood that had been lying in the sun for a few months. This stuff is only 30mm maximum diameter. I knew this wood was not entirely dry, but  surely it would be dry enough. How wrong I was.
wooden needle cases Sean Hellman
I thought it would be good see how much it would shrink by sticking it the microwave to dry it out. Even though I used branch wood the hole went a bit oval and I had to refit the lid. It is very easy to make stuff from green wood and wait a while and assume it is dry. So this could have been very embarrassing if I sold it, and a month  later I got a call saying it had split or the lid was stuck. This is why I like to leave my wares at least a few months or even half a year or more before selling. Wood takes a long time to settle down and stop moving and drying.


This is the small elm branch blank next to a 10ml syringe. The wood weight was 58grams before drying and 48 after, that is 10 grams of water or 10ml in total. Very far from dry. Okay this wood is oven dry, which is as dry as it can get, it will absorb moisture from the atmosphere and reach an equilibrium. 

I thought about green wood, so here is a small branch of sycamore. From green to dry 109 gm to 56 gm dry that is almost half the woods weight 53 gm of water or 53ml. 1gm of water or 1ml of water is 1cubic cm. I will keep this bit of wood and weigh it every month or so to track how much water it gains again. 

Below is an article I wrote for Living Woods magazine which explains how to measure the moisture content of any plank or branch wood.

Moisture in wood. Sean Hellman

Moisture meters are not the only way to measure moisture content of wood, there is a cheaper way, and you may have all the tools needed already, in your kitchen. I am talking about the traditional standard for measuring the moisture content of wood which is the oven drying method. 
A small sample piece of wood is cut from the plank or log that you want to determine the moisture content of. This sample is weighed and is represented as, Ws. The sample is then put into an oven at no more than 103 centigrade. This sample is then weighed every so often until a constant weight is achieved. This figure is represented as Wod.

Moisture content is expressed as a percentage, and is calculated with the formula:


                        Ws  -  Wod  
MC =                ___________        X     100
                                   Wod

The Ws weights of my samples are Cherry 163g, Oak 188g, Ash 131g and some kiln dried oak that had been sitting in my workshop for some months 121g.

The oak sample was from green oak from some chainsaw sculptures I had made and it was still very green. The readings are: 188g Ws , and after drying 122g Wod.

Ws, 188g  minus  Wod  122g  =  66 divided by  Wod  122g  = 0.54098 multiplied by 100  =  54.1% moisture content, which is wet.

In using this method I soon realized that the wood sample should not be too small and light. Also, the weighing scales should be able to read 10ths of a gram to get more accurate results. In this above example a 1 gram difference in weight, 123g instead of 122g, then the sample would have a moisture content of 52.8%. This is not a big deal in wet samples but if you have a small sample which is already quite dry, as in the kiln dried oak sample, a 1g difference will make a 1% change in the moisture content.

Once you have weighed and dried your samples of wood leave them in your workshop and weigh them every couple of weeks or so. By doing this you will gain an understanding of just how hydroscopic wood is and which woods absorb moisture faster than others. 

Readings taken a week after oven drying
Cherry 128g, oak137g, ash 109g, kiln dried oak 114g
For example, the oak sample, which is an end grain slice, and over a week has reabsorbed moisture from the atmosphere fastest out of all the samples and now has a moisture content of 12%.

It is tempting to take a sample slice from the end grain of your board. Do not do this, as you will not get accurate moisture content of the board, end grain will dry out faster than wood in the centre of a board. If measuring the moisture content of a board 4 inches thick, cut a slice off at least 2 feet into the board, cut out the centre 2 inches, and measure these two samples separately. Wood will dry out on the outside faster than the inside and by using this technique you may find that the outside of the board is a lot drier than the inside. If a plank is dried rapidly or improperly you can get case-hardening, which means the outside is drier than the inside. This can lead to false moisture meter readings as most cheaper meters can only read up to a maximum of a centimetre below the surface of the wood. Case-hardened wood will warp in use and can be difficult to cut.

Even if you do own a moisture metre, this oven drying process can still be useful, as you can check that the meter is working and is calibrated correctly.

Thursday, 20 June 2013

Wood warp, how wood moves.

I found a couple of small planks in the workshop that I had forgotten about.They were dimensioned  them so that each was exactly the same size. The only difference between them was that one was tangentially cut and the other radially cut, I even wrote their measurements on them. They had been sitting near my stove for over 3 years, so I can truly say that they are now seasoned. The wood is aspen.

A lot of you will know how wood moves, but if you are starting out then it can all be a bit of a mystery. In order to work competently with wood we must know how wood moves as it shrinks and dries. It can be easy to get caught out and find that the project you have been working on has now warped or  shrunk in such a way that is no longer saleable.
The above diagram should be self explanatory. Tangentially cut wood is also know as through and through cut or flat sawn, and I am sure is also know by many other terms as well.  (1) in the diagram is a radially cut, or quarter sawn  wood. Radially cut wood can be more expensive because it is the most stable and often has lovely medullary ray patterns on the surface, as in quarter sawn oak, or lacewood in London plane.
The above photo are the aspen planks. The top plank in each photo is tangentially sawn wood. The bottom is radially sawn wood. The discs are oak turned green and allowed to dry. They have been arranged on the aspen planks to show the grain orientation and to give another visual way of seeing in what planes the wood shrinks.
Click on the image to make it bigger.
Turned green oak and dried, then cut into discs. The measurements are 32.55mm and 28.88mm making  a shrinkage of 3.67mm.
We can see that wood shrinks far more along the growth rings than across the growth rings. 


 The above faces (widths) of the aspen have the relevant end sections pasted onto them.
Radial on the left; green size 83.10mm dried width 81.50mm which is a 1.6mm shrinkage
Tangentially cut on the right; 83.65 and dried width 78.50 which is a 5.15mm shrinkage.

 The side view of the planks (depth)
Radial on the left 29.15mm green, 28.21mm dry, 0.91 shrinkage
Tangentially cut on the right, green 29.05 green, 28.58 dry, 0.47 shrinkage.


This is a 19.5 inch wide oak plank 3 inches deep. There is no way that this could ever be planed down to 3 inch thick plank, you would be very lucky to get 2.5 inches deep planned plank from this. Note how it has shrunk more at the ends and is thicker in the middle. All flat sawn planks will cup, even kiln dried stock that has been planed and thicknessed flat will still have a tendency to cup over time.

I have not talked about dimensional change in the length, well there is none to speak of, especially in short lengths of wood. My bit was exactly the same length. I am sure there will be a slight reduction in length, but I have never set aside a 12ft plank and measured it green and dry.

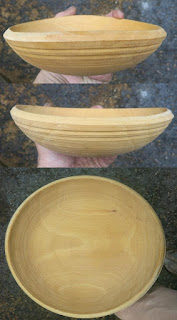
This is how a bowl shrinks as it dries. I love how the wood always has the final say in pole lathe turned bowls.


Saturday, 15 June 2013

Modified axe the answer

 Sherwood modified it so that he could take out raised bumps or bows out of the middle of cleft wood. The centre or the domed part of the axe is going to hit the wood first and so it can be used very precisely and will not cut the outer edges of the wood. Mainly used along the grain. Other axes do work but with a rounded blade this axe will only cut on a small section or arc of the blade.

If you have ever used an"Oxhead" adze you will have noticed that it not really a tool fit for purpose. This adze has a dome just like Sherwoods axe but in this case it only offers disadvantages. Often sold as a chair makers adze for bottoming chair seats and it is for this purpose I bought it. I sold it on years ago as it did not work. 


The bevel is huge and being on the inside it needs a lot of work to make it more acute. The obtuse bevel can be sharpened razor sharp but the problem is, as the tool slices through the wood, that this huge bevel will slow it down. A simple analogy is try pushing you fist through sand on the beech and then pushing your hand with your fingers tips first. The obtuse bevel will mean you will have to put a lot more effort, or energy, into the tool.
The sweep, that is the curve on the underside is steep and so will only take out small bites of wood, not what you want for chair seats where a shallow sweep is best.
The worst bit is that the edge is domed. WTF, who designed this tool, not someone who ever used an adze for chair bottoming. The shaving that can be taken out is small and you will be there for hours trying to hollow out a seat.

Now there well may be people who have found the perfect use of this tool, please let me know. For me and my uses this tool does not work and please do not waste your money on it.

Trevor, a student of mine, has just bought a second hand Gransfor Bruks two handed adze. I like it and would consider buying it for bowl work and chair bottoming. The sweep is less steep than the hand adze but still not quite flat enough for chair work. It works nicely and on a bowl it will waste the wood with little effort, whereas with the hand adze you will be still bashing away with an achey arm. I am still not sure about the GB hand adze, something not quite right about it. If you have one do grind the bevel further back, I have found this helps.

Monday, 10 June 2013

A modified axe

Been rather busy of late, but I thought I would share this great axe which has been modified by a friend of mine, Sherwood Keogh who splits a lot of wood and makes a lot of fencing, gates and lath.
Any guesses as to why it has been modified in such a way?  The answer in a few days.