Friday 23 December 2011

Dough bowl, flour scoop and bread

I have been making my own bread for years now, but only this year I got rid of the bread maker. This has been a liberating experience and I find making bread is now much more fun. I decided to start from scratch by making my own yeast. This is easy, by putting flour in a small bowl and leaving for a few weeks, adding a bit more flour and water every 3 days. The natural yeasts in the flour and atmosphere soon get to work. People have been known to have had their yeast 'starter', or 'mother', for decades.
Next I put my flour in a bowl with a bit of salt and water with most of the starter. This is mixed up and left all day. I come home from work and after dinner, empty the risen bread into a baking tin and let rise again for a few hours, depending on how warm it is. Then, into the oven it goes.
You may have been told that you need to knead your dough for 10 minutes or so. I have found no need for this, I may knead a bit more flour into the mix if it is a bit wet or if I need to divide it up into tins and rolls. This kneading will only take a minute at most. The actual time it takes me to make bread, including washing up is maybe 15 minutes.
After adzing out the bowl, (as shown in the last post), I used long handled hook knives to finish the inside and a Mora push knife on the outside. I wanted to have a smooth inside as I will be washing this bowl out regularly. The best and quickest way to do this is by scraping. As you can see the shavings are paper thin and leave a very good finish. Scraping is always far quicker and easier than going through the grades of sandpaper, and if you want a smooth finish then learn about scrapers. I will be doing a video on how to sharpen a scraper.


As you may have noticed from my Kuksas, I like handles. The handles on this bowl took a fair amount of time to do. This is one reason that we rarely see handles like this on wooden artefacts.

I also now buy some of my flour in the sack and need to decant from sack into a smaller container. So I made a scoop from a half log of birch.

I have found that even with a busy life, I have easily found time to make all my own wheat bread as well as rye bread for my wife. I even look forward to it. It is hard for me to explain why but it certainly has to do with working with a living organism (yeast) and also, I have control over what goes into my food. Another pleasure of this about being connected to the process of producing natural and slow food. I find a sort of meditation in the making of bread. We, as a culture, are losing connection to meaningful daily work with the hands, the everyday acts of creation. Making my own bread is a way of reclaiming that in another area of my life.

Tuesday 20 December 2011

Sharing

I often give freely of my knowledge, not only in these blogs but also when meeting and talking to people. I am also an active member of the Bodgers Forum, the biggest green wood working forum in the world.

I have met and seen many people, even those who are the last in the line of their craft, who hold onto their "secrets" with an iron fist. There are also many businesses and multinational companies that want to keep all knowledge to themselves, through intellectual property rights and patents. This means that anyone wanting to use this knowledge has to pay, even if this is a gene in the human body. Do not get me wrong, we all need to make a living, but some people and companies spend far to much time and money on their secrets.


It is clear to me that the free-market capitalist system does not always work very well and we need to find other ways of working together. All this economic doom and gloom pisses me off big time and I find myself being dragged into it.

There are other ways of working. I do not mean the lovey-dovey hippy commune or Communist ways, but ways that are empowering to the individual and beneficial to society. Through this individual action we can collectively make a difference.


Take a look at this inspirational video from TED Talks. This will show you how sharing knowledge and ideas can make a real and empowering difference in the world. In fact have a look, over Christmas, at the other TED Talks. These people inspire me, they give me hope, and they leave me buzzing with new and amazing ideas.
This video is not about wood, but I think that the ideas and the ways that people can work together  are so important and worth taking on board.

Thursday 15 December 2011

Dogs, a really useful way of holding wood.

The bowl horse I have is for smaller rather than larger bowls. So I had to find a way of holding a bowl blank. This is a half log of birch which is going to be a dough bowl for making my bread in.
I dug out my dogs, these are often used for glueing up boards, and because of the shape of the points, they pull the boards the 2 board together. Large ones, up to a couple of feet long, are used for holding tree trunks in place whilst they are being sawed or hewed.
These dogs are about 3 to 4 inches long and are perfect for holding the bowl blank in place on my saw horse. Once banged in they do not move at all, and are easily knocked out when the work on the blank is finished.


If you ever come across some, buy them, they are really useful for all sorts of projects. Not sure what Milo makes of them!

Tuesday 29 November 2011

Push me, pull me. My favourite 6 drawknives

These are the 6 draw-knives I would want to take if I were castaway on desert island.
Starting with the biggest:


 Top is the Granfors Bruks large draw-knife. Designed for debarking logs, but I find it useful for shaping larger work and even use it in a big shaving horse. I like the weight, it is heavy, it has its own momentum when cutting and is easy to use. It is also curved in 2 planes and can not be used on flat timbers, and certainly not bevel down.

Below is a R Sorby again a large draw-knife, 2 inches wide and blade length is12.5 inches long.

Top is a Graves draw-knife, this is my standard and most-used for anything but spoons and smaller work. 1.5 inch wide and 10 inches long.

Below is a Gilpin "gents" draw-knife 1.1/4 wide and 6 inches long. Box wood handles. This is my favourite.
Do note the handles on these knives, I like how they are thin at the index and little finger positions, this is the handle shape I prefer.

Push knives: top is a Mora push-knife. Unfortunately it has a bevel on both sides, I would have liked one side to be flat, making it a more versatile tool. Just over 1 inch and 4.1/4 long. 
This is best for the outside of bowls, and I have never successfully used it as a draw-knife (pull knife).

Below is a riving knife I made from O1 steel, and is for making fan birds. 3/4 inch by1.3/4 long and only 1 mm thick and very flexible. Ideal for the riving of feathers for fans and fan birds. Used also for the shaping of the feather tips, working across the grain in pull mode.

So there you have it, the draw-knives I have collected for my work. I have others for use on courses or that I sell, but these are staying with me. 
If I only had one it would be the Graves, as it is a good all rounder. This is the size I recommend when buying your first draw-knife.


Tuesday 22 November 2011

Ladles, made from trunk and branch

I have made and finished off some half made ladles recently. The walnut one at the top is 9.5 inches long and the bowl is nearly 3 inches wide.

 And a detailed image
I saved the other part of the walnut log I split the ladle from.
I was given a small walnut tree that someone had cut down in their garden. Not being foresters, they had left 6 to 10 inch branches sticking out of the main trunk. Unfortunately all tree surgeons and foresters are taught to "sned" off all branches right next to the main trunk. This is why it is difficult to find forked or tripod branches or larger trunks of wood that us green woodworker so dearly love.
This is the position of the spoon in the walnut log
 Splitting wood out of a trunk/ branch can be a big unknown. I have yielded 2 ladles from a willow log before, but this is not common. With luck you will get one and if unlucky, nothing. Some woods are great and others like wild cherry, I have found, are impossible.

I started the split in the top of the branch coming off the trunk. It is common practice to start at the thin end of a log when splitting wood. I never had one split like this before, taking a V out of the trunk. Next step is to hit it with an axe, wave a knife at it and finish off by showing it a spoon knife, and hey presto, a ladle.

One last ladle made from sycamore with the branch coming out of the trunk at right angles.
The bowl is just under 2 inches across.

Why use a bent, forked or angular limb coming off a trunk? Because the the grain of the wood follows the shape of the spoon and is stronger than making a ladle from a straight log which will have lots of "short" or "cross grain" in it. These will break or get damaged more easily than spoons that follow the grain.

If you carve spoons and have not tried making a ladle like these, then find yourself some bent or forked wood and give it a go. Do gather a few bits, as failures can be common at first.


Monday 14 November 2011

Tool and forge making workshop

Making tools,

Tool making is empowering and is a step towards self sufficiency. I have had to make my own tools because there are none available to buy, e.g. long handle hook-knives and very small hook-knives for making salt spoons. Often, what is available is not quite right for the way we work, or is not designed for our needs so we can make copies to our own preferences or even re make existing tools.
Making tools also gives me immense satisfaction and pleasure, as I think it does for many others. The only problem is how far do we take it: will I have to dig my own ore and smelt it, and then make the tools to make the woodworking tool?. Of course I would also have to make my own files, dig my own natural sharpening stones.
These are things I would like to do one day: but back to what we can do here and now. Tool making is really simple and accessible to anyone, and for not much cost. I use a small gas forge that can be ready to work within seconds, and this is what we work with in my tool-making course. Next year I hope to have a small charcoal forge running as well. Tools can be made with a hammer, a pair of pliers, some sort of anvil which could be a sledge hammer and of course a forge.
We then make a small straight knife and then a hook knife for spoons, putting simple but functional handles on them and sharpening them to a razor edge. People often want to make other tools as well. Peter wanted some draw or dowel plates, and Jamie wanted to make a hook gouge for his bowl turning. He wanted it for a specific purpose. Aleric also wanted a very small hook knife for making salt spoons.


Not only did these guys go home with some useful tools but they also went home with the knowledge of how to make new tools or to reshape, harden and temper existing ones, which we do need to learn, especially with hook tools for the bowl lathe.
 You will have to wait until next year for my next tool making course, do check out my website for details. If you can not wait that long, then I run 1 to 1 or 2 to 1 workshops for a day or longer. If there are more of you, I can either travel to you or you can come to my workshop, I will give you a custom price for this.

Tuesday 18 October 2011

Cranbourne Chase Woodfair

What a joy to go to a well organised woodfair in the south of England. After the Tree Fest at Westonbirt
I realised that shows have not been good for me this year, and sales have been down by a very significant amount. I have had growth year on year for the last 18 years of trading, this year has been a wake up call. I am in the non essential and luxury goods market and people are cutting back, big time.
Dan and I had a great time at the show, always good to met up with people again, and make new friends. We met a few people who we know from the Bodgers forum, and it is always good to put a face to the name. It was good on Saturday night, talking to Kim and Tim of Former Glory and then being joined by Owen Jones and Jeremy Atkinson, and then Neil Taylor who bought me that last fatal drink.

This Woodfair runs competitions. Four prizes for 4 categories. This year I won the Peoples Choice. This is by public vote and the people chose me and my hummingbird supping nectar from a wooden flower. The prize was a beautiful box by Mathew Burt who judged the three other categories.

It is fantastic to be voted best in show, but during these hard economic times I do need to find new ways of selling my work, especially finding out more about advertising and marketing. If anyone has any ideas please contact me.
 Rod Poynting`s oak gate topped with copper caps.
Will Witham`s whale and fish puzzle. I have known Will for many years and he only lives a few miles away. He works mainly on the fretsaw.
Neil Taylors table/bench, pickled with vinegar and iron to blacken it. Neil has worked with Gudren Luitz and Mike Abbot. The tooled finish is stunning.


Wednesday 5 October 2011

Dan`s drawknife

Dan has been telling me all about the drawknife he has been making in his spare evenings. But when I saw it I was gobsmacked! It was indeed impressive. To pile on the admiration for Dan, I was even more surprised when he said he made it in the 2-brick kiln he made in my forge and tool making workshop that I ran last year.
 It just happened by chance that I wrote about how to handle a draw-knife just after Dan showed me his un-tempered knife.


I gave the drawknife a go and it works like a dream. Dan learnt a lot from the process and will change a few things next time. The tangs are a bit big at the curve and the handles are to big for my liking. Small things really, that will get changed next time, but this is how we learn. I am so impressed, what an amazing first drawknife.
This is the 2-brick forge that Dan made in my workshop.

Some of the tools made on the workshop. I think this years workshop in Oct is full, but you can always come and do a 1 or 2 day one-to-one workshop with me.

Thursday 29 September 2011

How to handle a drawknife and other tanged tools

To follow on from the post on how I sharpen drawknivies. Here is how to put new handles on it. I will assume that either you have handles, or can turn new handles, either on a pole lathe or a modern electric lathe. If turning on a pole lathe either turn green, dry the handles, and then turn again when dry to fit the ferules, or turn from seasoned wood. I often turn dry wood on the pole lathe if I want round turnings. If possible use the original ferules or use new ones or cut some from brass or copper pipe. The ferules will need to be put onto seasoned wood, we do not want the wood to shrink and the ferules to become loose. This is a C Whitehouse drawknife, and I turned the the handles to the same pattern as the originals.
I use long series drill bits and I drill in from each end rather than drilling all the way through. This way you will get the entry and exit holes in the right place. This process is not easy, so practise on odd bits of wood to hone your technique.
If necessary drill a larger hole part way through if the the tang is thick at the blade end. The old handles are split off using an old chisel.
I am lucky that the tangs are in reasonable condition. This one had a bit of rust and is slightly thin in the middle, but will work well enough. Sometimes you will need a new tang welded on. Unless you can do this yourself, find a friendly blacksmith or fabricator to do this for you.
 Make the tang straight by heating it with a blow torch. Make sure that the blade section does not get to hot as making the blade too hot can change the temper or hardness of the steel. Note that I have the blade on my anvil, which acts as a heat sink for the blade.
Make each tang straight and in line with each other.
Heat the tang up again and push the handle onto the red hot tang.

Do not push the handle all the way onto the tang, leave enough so you can hammer the handle firmly onto the tang. Pull the handle off as soon as you have got far enough down the tang. It is best to let the tangs cool down slowly as quenching in water can harden the tang and make it brittle.
When the drawknife is cool to the touch, paint linseed oil onto the tangs and inside the burnt hole. Using a scrap bit of wood with a hole drilled into it, bang the handle fully down into place.
I made a washer from a bit of brass, and if the tang sticks out a bit to far just file or cut the excess off. You only want 2 to 3mm protuding above the washer.
Using a ballpein hammer, mushroom over the tang. Do this hammering the tangs outer edge around in a circle, do not hit the tang square on in the centre.
The finished  handle.
Bevel up
Bevel down
With a wooden mask for the blade.

I use the same general principles for putting handles onto chisels.

Saturday 24 September 2011

Carved wooden hummingbird.

Sometimes it takes a simple addition to lift an item into being a great artefact. If you read my last post I was happier with the hummingbird drinking nectar from a wooden flower on a thin bent willow stick, which was totally impracticable. The other set up was functional and long lasting, but lacked something. At the workshop I had an idea of putting leaves onto the base of the flower. Needing something that was quick and simple I picked up some ash shavings from the shaving horse and fashioned them into petals.
The whole fanbird and flower is now more balanced.  I have noticed that it so easy to go too far with finishing or embellishment and ruin a piece of work. The" KISS" saying has a lot of truth to it, "keep it simple stupid". I thank my good sense to use waste shavings rather than making or carving wooden petals, which could have made the bird with flower more expensive and time consuming.

Thursday 22 September 2011

Hummingbird fan bird, with real wooden flower!

Same bird but 2 different flowers and flower stems. I know which I like best, but it is very likely to get broken.
I love the way it moves in a slight breeze. The other issue is that the thin willow stem will droop over time
This one will last and is easier to post and pack.

All fan birds are for sale, I hope to revamp my fan bird page on my web site and also have a few for sale on a sale page on this blog, very soon.

Saturday 17 September 2011

Drawknives , the blunt, the handleless, and the pitted. Make them cut like new

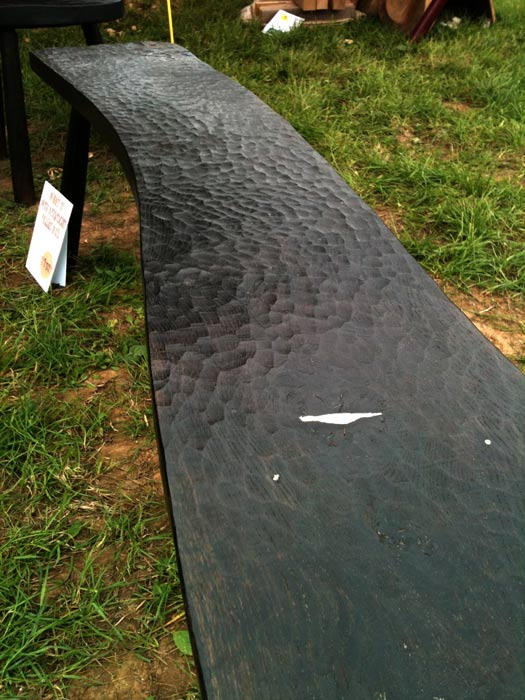
 I have used draw-knives for over 20 years now and I can still get passionate about them, as a tool for shaping wood. Both with rough and fine work, they are hard to beat. Of course you need another tool, the shaving horse to use them efficiently. Here is a link, to the Bodgers forum with lots of pictures of shaving horses.
I have a collection of draw knives I need to sell. Some of them need a lot of work including new handles, and some of them just need a good sharpening, so I thought I would take a few photos and share with you.

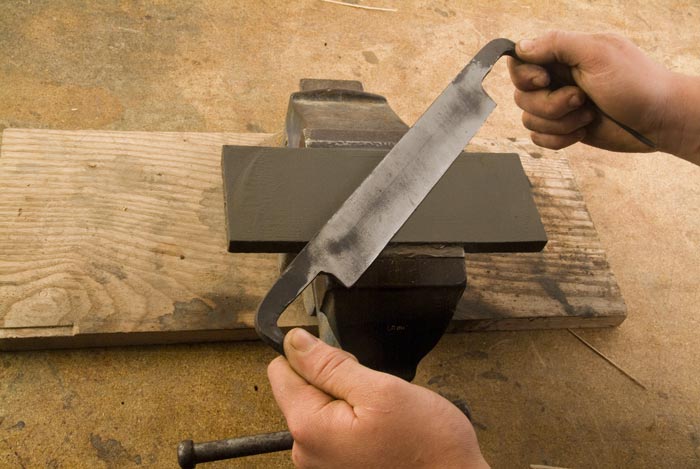
I start off by flattening the back of the knife. The back, in my definition, is the flat side. I always keep this side absolutely flat and never put any sort of bevel on it. I know that some authors and sharpening practitioners advocated a back bevel, but I see this as making the knife less useful. Why? Because if the back is flat then it operates as plane, against which the edge is guided. If you have a bevel on this side then the knife needs to be held at an angle against the wood, and it is then easier to erroneously dig in or pull out, when pulling the knife. A slight change in the angle the knife is held, then the more likely the blade is to produce an uneven surface. Anyway, the knife has a bevel on the other side with which to make concave cuts.

When the back has been flattened and any pits have been ground out, I then joint the edge. Jointing is running a stone at a 90 degree angle to to back of the blade. In other words, I am making the edge blunt. This takes out any chips and hollows and makes the blade straight or of the desired curve or crown.
I only joint when renovating tools, or when the edge has been damaged. If I get an odd imperfection in the edge I often leave it, and it will sharpen out over time.

The next step is to take lots of metal off the bevel. I want about a 20 to 25 degree angle for the primary bevel. The most useful machine for this is a bench grinder. A belt sander works well as well, but I have a dedicated wood one, and do not like using it for metal.
Bench grinders are great, but they do need to be used with an understanding of how they work. It is very easy to overheat the steel blade and make the edge soft. A bench grinder is aggressive, and it is easy to damage a blade very quickly.  This quality of the bench grinder is very useful in regrinding primary bevels, something that would take hours to do with,even, a very coarse bench stone. Start by using one on larger tools such as an axe.
You may well ask why do I not use the belt on this bench grinder. Simple: it is so under powered that it almost useless. This is a bottom of the line cheapest machine out there, and you get what you pay for. Put any sizeable lump of metal on the belt and only a small amount of pressure will stop the belt.

I have recently made a simple jig for the bench grinder to help guide the draw-knife. I used a few offcuts of wood and a few screws.


Note that I made the jig table at an angle, this is so the draw-knife handles do not get in the way of the grinder housing. I also use a screw to set the angle the knife is ground at, this screw can easily be moved to achieve a greater or lesser angle. This set up is pretty primitive and when I have time I may make a better jig. Before making this jig I just run the draw-knife along the metal table, and I do it freehand. Using a jig this way is a bit more accurate.
I have the jig at a slope because on this grinder it helps keeps the handle of the draw-knife away from touching the body of the grinder.

Remember to do a few passes and check to see how warm the metal is. It is best to do say 4 or 5 passes and then just get on with something else while the metal cools down. There is a lot to be said about not dipping in water to cool the metal down. Some people say that this can cause tiny fractures in the edge, invisible to the naked eye, which can lead to tiny chips.
Back to the bench stone: this one is a modern Norton oil stone and one of the coarsest  they do. I now rub the draw-knife over the stone to produce the primary bevel on the knife. I am not one to get into measuring all the time, as I have been sharpening for so many years that body and brain just get to know what is what, a tacit knowledge that only comes from doing. So do as I say and not as I do, and get a protractor that can measure the angles of your blades, make up wooden blocks so you can compare the angle of the knife you are holding. The last thing you want to do is to put a more obtuse bevel on your tool.
The main thing about sharpening is holding the tool at a consistent angle, and patience, and having a loupe or small magnifying device to study the edge with.
Continue with honing on finer stones and  strop if you want to. Yes I said strop, I strop most of my cutting tools, because it is my belief that the finer the edge of the tool has been polished to the longer it will stay sharper for. A quick strop can bring the edge back to life again and saves time using the hones.
On a side note, if you are using a draw-knife for a lot of concave cutting then a more obtuse bevel works better, or is this just an excuse for acquiring more tools?

Monday 12 September 2011

Rocking Chair

I made this rocking chair for a lady I met on a spoon making workshop that I ran last year. I later met Marilyn again, at Rivenstone Festival, where she commission the chair.

The chair is made from ash split and shaved from the log. The seat is a plank of London plane. All other parts are made from oak. The plan was for me to have it made by this summer when she came back to Devon for a holiday. I had the it dry fitted but not glued up for a test fitting, but seven days later she collected the finished chair.
Chair making is something I rarely do; but this is a copy of a similar chair that Anton Coaker from English Hardwoods commission from me many years ago. Anton gave me a not quite dry slab of burr oak to make the seat from. Since making the chair, the seat has dried and moved, and although smooth to the touch it is bumpy and warped. This has not detracted from its function, feel or appearance. Every time I buy wood from Anton I see it in his kitchen and can see how well it has stood the test of time with 3 children growing up with it, and sometimes using it as a climbing frame.

Saturday 20 August 2011

Tool tips

A simple tool tip.
This is great if you do not have much space in your workshop. I have a large workshop but do not have room for everything to be out all the time.
My bench grinder is screwed to a plank of wood so that it can be stored and moved around easily. The plank can be G clamped to any table and bench.

I have engineers vices that are not used all the time and I also want to take them away from the workshop, eg when running workshops. The vice is screwed onto a plank of wood and again this can be G clamped onto any surface.
Depending on what you are doing with the vice you may not even have to clamp it to the table.