Monday, 31 December 2012
The Commons
I want to share something that I find inspiring and resonates deeply with me. I know a lot of regular readers of this blog will agree with these ideas. So onward into 2013, a year of positive change.
http://onthecommons.org/sites/default/files/celebrating-the-commons.pdf
Wednesday, 26 December 2012
Why we do not leave an axe in the axe block
One thing that I always teach my students is that you never leave an axe on or in your axe block.

An axe can easily be knocked out and fall. A potential source of injury and a damaged axe. The axe belongs on the floor under the block or in its mask or holder, or may be on a large surface.
Have a look at these photos and you will see that bits of wood have stuck to the axe. If there is any moisture in the wood this can start rusting as well. These bits of wood are really stuck and do take effort to remove. The other problem with this, is that the could stop the edge biting into the wood. The skipping axe is another potential injury, very small, but lets keep the odds in our favour.
You will see that the axe in the above picture has its whole edge in the wood. I have been told by many different people about injuries caused by the tip only being in the block. The hand or a digit can get caught between the block and the inclined axe edge. Go on set your axe in a block and see what happens if you reach, for say, a knife on the block, not looking properly. The digit will get trapped and badly cut. Really not nice. Now who would set an axe in a tree trunk at 6 foot above ground? You know, to keep it safe. Do you want this falling on your head or shoulder? Again I heard of someone doing this and then stringing up a hammock on the same branch, caught his hand between axe edge and tree.

Personally I prefer cross grain blocks rather than end grain block. The axe does not get stuck in a cross grain block. More importantly it is harder to chop your axe into, so you are not able to store your axe this way.
On another note my friend barn and talented spoon carver has posted a video on axe blocks, well worth a watch.
My Axe Blocks from barn carder on Vimeo.

An axe can easily be knocked out and fall. A potential source of injury and a damaged axe. The axe belongs on the floor under the block or in its mask or holder, or may be on a large surface.
Have a look at these photos and you will see that bits of wood have stuck to the axe. If there is any moisture in the wood this can start rusting as well. These bits of wood are really stuck and do take effort to remove. The other problem with this, is that the could stop the edge biting into the wood. The skipping axe is another potential injury, very small, but lets keep the odds in our favour.
You will see that the axe in the above picture has its whole edge in the wood. I have been told by many different people about injuries caused by the tip only being in the block. The hand or a digit can get caught between the block and the inclined axe edge. Go on set your axe in a block and see what happens if you reach, for say, a knife on the block, not looking properly. The digit will get trapped and badly cut. Really not nice. Now who would set an axe in a tree trunk at 6 foot above ground? You know, to keep it safe. Do you want this falling on your head or shoulder? Again I heard of someone doing this and then stringing up a hammock on the same branch, caught his hand between axe edge and tree.

What stories do you have about your axes? How do you keep them safe? Finally what are the most stupid things you have seen or heard? Do let me know, and post a comment. When I first started teaching at camps and festivals once or twice people would chop the axe into the ground "to keep it safe". The horror, the speechlessness, the time then spent grinding out the damage.
On another note my friend barn and talented spoon carver has posted a video on axe blocks, well worth a watch.
My Axe Blocks from barn carder on Vimeo.
Monday, 24 December 2012
Seasons Greetings
Festive greetings to you all - and whatever you celebrate - let it be merry !

and
all the very best for the New Year, may it bring you new learnings, techniques, people and fun into your life.
Monday, 22 October 2012
My friend Jon Mac
Jon works only with 3 types of tool. Axe, knife and hook knife.
He now owns a set which he has helped design (apart from the hook knife) which are made by skilled craftsmen in this country.
Today Milo and I had the pleasure of spending most of the day with him and a visiting friend Haily. With new tools for me to have a play with, spoons had to be made. Milo got much love from Haily which meant she did not get much carving done.
 I think this is the first time I have used an axe made in this country that is not older than 60 plus years. Eye candy it may be, but it also performs. Well done Nic Westermann a lovely tool indeed. A mild steel body with a silver steel edge. I like the rounded edges on the poll so that it can fit in comfortably in the hand, great for shaving cuts.
The other tool was made by Chris Grant, the MiniMaC, little brother to the MaChris a bushcrafter/carver. Lovely knife made from ball bearing steel, I am actually getting to like the handle on it. Some of you may know that I like thinner handles.
The hook is a Nic Westermann, called the finishing knife, and is throughly recommeded if you do not mind putting your own handle on knives. The way that Jon uses this knife is outstanding. I can match Jon's technical level but not his power.
 This is no small kuksa and it only seamed minutes later that he had roughed it out. It helps that Jon is a big man with big hands. There is no way that I would do this myself, I do not like hurting hands. I would get the adze out, and even vice it up and use 2 handed tools to do this with.
 The nearly finished item ready for final shaping.

He now owns a set which he has helped design (apart from the hook knife) which are made by skilled craftsmen in this country.
Today Milo and I had the pleasure of spending most of the day with him and a visiting friend Haily. With new tools for me to have a play with, spoons had to be made. Milo got much love from Haily which meant she did not get much carving done.

The other tool was made by Chris Grant, the MiniMaC, little brother to the MaChris a bushcrafter/carver. Lovely knife made from ball bearing steel, I am actually getting to like the handle on it. Some of you may know that I like thinner handles.
The hook is a Nic Westermann, called the finishing knife, and is throughly recommeded if you do not mind putting your own handle on knives. The way that Jon uses this knife is outstanding. I can match Jon's technical level but not his power.


Sunday, 7 October 2012
Axe mask

They work really well and most of my axes have wooden masks. The band is inner tube from car or lorry wheels. and these can be easily picked up free from anywhere that changes tyres. Maybe not the most beautiful of items, and I am sure that some of you will come up with more elegant solutions.
Morticing by hand is easy and it does not need to take very long.
So send examples to me that you have made and I will post them up here.
Saturday, 29 September 2012
Spoonfest part 2. Two spoons by great makers
I bought 2 spoons at Spoonfest. There are design aspects of these spoons that I love, both are great spoons and fulfil their function perfectly, and they look good too. I often find that if something performs its function well, it often looks good.
It was great to meet and spend time with both these craftsmen. The first is Jarrod from the USA and his is a small, in fact very small eating spoon, made quickly with a milk paint handle.
 The knife work can be easily seen, there is no messing around here. Facets or large knife cuts left on spoons can work really well, but you need to have confidence in your carving and more importunely experience. I have seen so many spoons where large cuts do not work and a spoon just looks unfinished.
 One of the things I love about Jarrods spoon is the handle crank. Turn a spoon over and lay it on a flat surface you can see it clearly. Try it with your spoons. I carved a number of spoons copying this shape and I was really surprised about just how deep I had to carve.
 Look at how the spoon tapers towards the end of the bowl. It gets thin, really thin and this fits into the mouth just right, a real pleasure to eat off.
So this is one I made, it is a bit more solid than Jarrods, and with a longer handle.


 I do notice that I tend to spend more time finishing my spoons, I cannot help it, I enjoy it too much.
The other spoon I bought was made by a Swedish craftsman Fritiof Runhall who makes some of the most beautiful and creative spoons I have ever seen.
 Made from a crooked branch, a finely knife finished spoon with a handle with a forward curve in that is just so sweet. The way it fits in the hand is perfect.
 Fritiof has a trade mark which is clearly seen on the inside of the bowl, this is not easy to achieve. He often carves finials on the ends of the spoons.
 Again have a look at the bowl shape especially at the tip.
 I have been carving hearts at the end of mine. What I love about spoons is their infinite 3 dimensional shapes, they are hand held sculptural forms and you can go on forever with all the possible variations.
 To finish off this post, a couple more Fritiof spoons, photos taken in the Spoonfest gallery.
 Next post I hope to add the photos I took at the gallery which include Stuart Kings spoon collection.
It was great to meet and spend time with both these craftsmen. The first is Jarrod from the USA and his is a small, in fact very small eating spoon, made quickly with a milk paint handle.


The other spoon I bought was made by a Swedish craftsman Fritiof Runhall who makes some of the most beautiful and creative spoons I have ever seen.


Wednesday, 12 September 2012
Spoonfest, part 1
Those of you who could not attend, here is some good news for you: it rained. Well. a few showers. The workshops were over subscribed, but more were put on to motivate this to some extent.
All tools had to be put away at 7pm, when the bar opened.
Not very good phone signals.
The grass was the wrong shade of green.
Well, you missed the best green wood event ever! Tough! Learn your lesson and buy a ticket for next year! We all loved it.
I was there teaching. I did not manage to book onto any workshops myself and would have loved to have done quite a few. I can safely say that we all learned, we were all inspired. Spoon making in the UK has now significantly improved, both in its teaching and in its practise.


 What I loved about Spoonfest was that beginners, men, woman, boys and girls all got stuck in.
Here is a short video, mainly of Barn and Robin opening Spoonfest.
I have taken lots of photos of spoons, and I even bought a couple. Next post, I hope to talk about the various design aspects of these spoons and what about them really 'floats my boat'. This all may take some time, as I have been travelling around a lot. Just off the the APF and then down to the Weald Wood Fair a week after.
All tools had to be put away at 7pm, when the bar opened.
Not very good phone signals.
The grass was the wrong shade of green.
Well, you missed the best green wood event ever! Tough! Learn your lesson and buy a ticket for next year! We all loved it.
I was there teaching. I did not manage to book onto any workshops myself and would have loved to have done quite a few. I can safely say that we all learned, we were all inspired. Spoon making in the UK has now significantly improved, both in its teaching and in its practise.

Spoonshop, Spoons, a few tools and teeshirts.

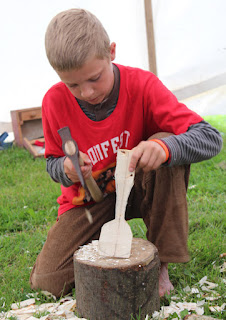
All ages made spoons. Great to see the next generation start early

I taught how to axe out scoops and ladles from straight wood. This is a form of extreme spoon making as it can be easy to have too much short grain and snap your scoop. What I hoped to do, by pushing the wood to its limits, was to inform people about that all important crank in spoons. After axing out such extreme cranks, then making eating or serving spoons becomes childs play. I was asked, and hope to, in the winter, to do a video tutorial on making a small scoop.

A few people from one of my classes

Here is a short video, mainly of Barn and Robin opening Spoonfest.
Tuesday, 28 August 2012
Treefest
I have a lot of posts to write, especially about the inspirational Spoonfest that I was teaching at. I have been busy and have just got back from Treefest. Another wet show and another day drying tents out, and I did some more filming with JP. We are pitching an idea to TV companies, it is a fickle business and more than likely it will not happen, fingers crossed it will. All very exciting. More info if and when.
My friend Jon Mac came with me to Treefest as Lucy is on standby to run down to Cornwall as her eldest is about to give birth. It was great spending 4 days with Jon, and then the organisers turned up with this.


How cool is that?
Saturday, 4 August 2012
Large shrink pot
I have a load of shrink pots half finished in my workshop. This happens quite naturally as the making is split into 2 parts, working the wood when it is green and allowing it to dry, and once seasoned making the lid and finishing. It is always nice to make when the mood takes hold, so I finished this 10 inch diameter pot with its willow lid and elm handle. I do love handles and I make them for doors and cupboards, hint, hint, you can buy them off me. Handles to me are a bit like spoons: they have an infinite variation of form and are amazing 3 dimensional sculptural forms.
 I could spend all day making handles. This one I wanted to be secured by "natural" means and so I drilled a couple of holes in the lid and made a long pin to pierce the handle tenons.
 The inside of my shrink pots are caressed with pure beeswax and bathed in a relaxing heat to help it penetrate the wood. The outside and lid is drizzled in pure cold pressed linseed oil from the pastoral fields of rural sussex. I use beeswax as I do not know what people are going to use these pots for and beeswax is great for food and everything else, as well as sealing any gaps or holes.
 I have also finished my largest pot to date an 18 inch high ash one.
 The willow elm and sycamore pot (the one in the front) has been sanded. As you all know I like a tooled finish, but sycamore has such a lovely smooth and pure creamy white white finish that even with a razor sharp spokeshave the grain was chipping out in parts. I know that I am a perfectionist and in this case it just seemed right to sand, and this contrasts very well with the tooled finish of the lid. I now find that a very sharp drawknife, bevel up is the best way to go. This seems to work better than a spokeshave.
On another note my good friend and inspirational carver Jon Mac has introduced me to the Abranet sanding sheets, these are great for spoons and other 3 dimensional sanding. If you need to go over to the dark side and sand then these sanding sheets come very highly recommended by me.
 My favourite work of Jon's are his snow goose drinking vessels which I very much lust over.


On another note my good friend and inspirational carver Jon Mac has introduced me to the Abranet sanding sheets, these are great for spoons and other 3 dimensional sanding. If you need to go over to the dark side and sand then these sanding sheets come very highly recommended by me.

Tuesday, 24 July 2012
Fan birds, blackbirds and traditional 4 piece birds
I have been developing and making some new birds. I have managed to make a decent blackbird and a way of quickly making the tail longer than the bottom wing feathers. I love watching the blackbird and listening to them. The shape and colour of the male blackbird is beautiful, and the way it flies low to the ground and twitches its tail is typical of this species.


I have also been making 4 part birds, doves, similar to ones I saw in the Pinto collection at the Birmingham Museum (sorry no photos, as I do not have permissions to publish the ones I took). These have 3 holes drilled into the tail and body, and separately made feathers are glued into these holes. I find this a hassle to do and so far prefer to keep the feathers attached to a small plug of wood which is then glued into the holes; but, aware that wood shrinks as it dries, I can not put these together straight away.


I had one of the best shows selling fan birds, at Exeter Craft Fair, and nearly sold out. This is heartening because I have had a year of bad shows, because of the rain and the economy and my van dying, etc. I met a Swiss woman there, who said that people hung birds in their houses to bring peace into the family home.
I have been talking to Sally Nye who with her husband David, has done some amazing research throughout Russia, Europe and the USA on fan birds.
A story from the comments section of an article they wrote:
"We had heard many times that the lumberjacks, or woodsmen, in the Upper Peninsula of Michigan, would make these birds in the evening while gathered around a fire for warmth and companionship. Once completed the birds would be tossed into a box to be used as kindling by the cook come morning to get the wood stove started. Many of these men were of Finnish or Scandinavian descent. They are beautiful that mass production can't compare."(sic)
I would never dream of doing such a thing, but I have burnt many failed ones myself, and I have had a fair few failures, or ones that get broken. This attitude reminds me that there is great joy in doing, and that it is not always the outcome that is important, but the making. Anyway David and Sally's website is http://www.FanCarversWorld.com/index.html
On another note I just want to show how the feathers are rived, i.e. split, just like splitting firewood but more controlled. Often I have noticed how the wood split follows the grain; the photo below is not the most extreme example of this but look at the bottom 10 feathers and you will see the kink.
 This photo is taken in raking light and is typical of a split surface. I use a very sharp riving knife, but it goes to show that the cutting edge is only important when starting. I have also come across a guy on a bushcraft forum who uses a kitchen knife, especially because it it is thin in cross section.


I have been talking to Sally Nye who with her husband David, has done some amazing research throughout Russia, Europe and the USA on fan birds.
A story from the comments section of an article they wrote:
"We had heard many times that the lumberjacks, or woodsmen, in the Upper Peninsula of Michigan, would make these birds in the evening while gathered around a fire for warmth and companionship. Once completed the birds would be tossed into a box to be used as kindling by the cook come morning to get the wood stove started. Many of these men were of Finnish or Scandinavian descent. They are beautiful that mass production can't compare."(sic)
I would never dream of doing such a thing, but I have burnt many failed ones myself, and I have had a fair few failures, or ones that get broken. This attitude reminds me that there is great joy in doing, and that it is not always the outcome that is important, but the making. Anyway David and Sally's website is http://www.FanCarversWorld.com/index.html
On another note I just want to show how the feathers are rived, i.e. split, just like splitting firewood but more controlled. Often I have noticed how the wood split follows the grain; the photo below is not the most extreme example of this but look at the bottom 10 feathers and you will see the kink.


Friday, 20 July 2012
Coracle fishing a family tradition
A video short on Raymond Rees and his son Malcolm on coracle fishing in Wales http://www.bbc.co.uk/news/magazine-18819075
Thanks to Chris Grant for bringing this to my attention.
Thanks to Chris Grant for bringing this to my attention.
Saturday, 14 July 2012
New shaving horse
Peter Galbert, chair maker, has come up with a new shave horse design, I have just made one and I am very impressed with it. One of my main problems with these tools is the time it takes to change the height of the head so that I can use smaller or larger billets of wood. In the past if I was shaving a largish bit of wood and then needed to do small spindles then my legs would be at full stretch. With the Smarthead horse, as Peter calls it, I just need to pull the head forward and click it into a new position on the internal ratchet. Moving it backwards to have a greater mouth opening is just as easy.

 I have had to thin down and wax the internal components as they were a bit stiff. I do wonder how it will operate if kept outside or in wet conditions. I suppose if everything is made a bit looser and it should be okay, make it out of oak and it should last well outside.
The other great thing about this design is that it may be able to be retro fitted to your existing horse.

 Peter has a whole series of videos and even full scale plans, all free, on his blog at http://chairnotes.blogspot.co.uk/2012/06/smarthead-shavehorse.html
The Smarthead horse is fun and satisfying to make and suits my style of working perfectly.

 It will be going on tour with me at the shows I attend, Exeter Craft festival, Spoonfest, Treefest, APF, and the Bentley wood fair. so pop along and have a go on it.


The other great thing about this design is that it may be able to be retro fitted to your existing horse.


The Smarthead horse is fun and satisfying to make and suits my style of working perfectly.


Saturday, 30 June 2012
Wood goes to war
Not green woodwork but I was fascinated by this film on various levels so I thought I would share.
http://ssa.nls.uk/film.cfm?fid=1509&search_term=world%20war&search_join_type=AND&search_fuzzy=yes
http://ssa.nls.uk/film.cfm?fid=1509&search_term=world%20war&search_join_type=AND&search_fuzzy=yes
Wednesday, 27 June 2012
Knife board
These were common at one time and are cheap to make and maintain. They work remarkable well.
Apologies about the auto focus going in and out of focus.
Apologies about the auto focus going in and out of focus.
Saturday, 16 June 2012
Coppice Week and fan birds
I was head-hunted and persuaded to go to Kent to run some fan bird workshops for the Sussex and Surrey Coppice Group for their Coppice Week. They pay well and I went had a wonderful time. It was in part of Kent where I grew up until my parents moved us, when I was aged 11, to Mid Wales.

The groups were small, 3 people per day. We used green ash and on the first day. Lucie, Chloe and Tom, got stuck in. They both made 2 birds each. Actually, I was gobsmacked at the quality and beauty of all the birds I wish I had had someone to teach me, it would have saved so much of my time doing it wrong or figuring out (now) simple mistakes.


Cloe and Tom

Lucie, who said that she had never made anything before. Lucie runs her own woodland management company. www.thenaturalpath.org.uk

Day 2 and all blokes. John, who arranged for this fan bird course, supplied some ash. This is the first time I have used ash that is no good, for fan birds that is. Just goes to show that ash good for other jobs can have characteristics that are not good for birds. I managed to make a decent bird but had a few challenges with it, the biggest one being how brittle it was. Alan's bird's wings all fell off. Today they made 3 birds each. I have no problem with using bad material as long as we also use good stuff as well. It is good to have a comparison, so that when you use bad material you do not blame yourself and think you have lost your ability. The only reason these guys made more birds was that they have a lot more experience in using, and making with, hand tools.

I made a tree from a tree. I have never seen anything like this before and was inspired by the elderflower blossom and all the riving happening that day. This is something I will play with more.
From the left: Alan, John, me and Carl

Richard bought his round house, which came in very useful, the weather has been wet and windy again. We spent some great evenings in here chatting and laughing


Copper and salts thrown in the fire, some lovely colours.


A bark-basket making course going on next to my workshop, the wood is sweet chestnut.

Neil McLaughlan ran the hurdle making. Great bloke and hurdle maker, I really enjoyed chatting to him during the evenings. No website, no email just a phone number

Littlestone on sea, and you can see Dungeness nuclear power station in the distance, I remember coming here and to Camber sands just down the road, as a kid.

The mud flats with 2 inches of water on top and a fair wind blowing.
I will be attending the Weald Woodfair with the Coppice group in Sept, see you there.
Subscribe to:
Posts (Atom)


