Sunday, 26 December 2010

Coracles and Edwardian Farm

Sean making a coracle on Edwardian Farm

I was on Edwardian Farm, episode 8, this Friday 24th Dec making a coracle. For those of you who have not seen it, it is an ongoing documentary about 3 people who live and work on a farm as they would have done in Edwardian times, 1901 to about 1920.

I spent a very enjoyable 6 hours or so with Alex helping him make a coracle, all of which was filmed. During the day's filming I went into great detail about how to make a coracle, but only a brief overview was shown on the TV. If you just want to see the coracle bit, then it starts about 16 mins in, and finishing it off at 20mins, the coracle being used at about 24 mins. I bought the book the other day and there is a small photo of me in it. Being a person who loves to know how things work or get made, Edwardian Farm has been fascinating for me, both Lucy and I love social history. I wish they had the time to go into far more detail both in the book and series, but I know they need to make an engaging and entertaining program. A program that I would love to see would not appeal so much to the normal BBC2 audience.
I do not like watching myself, especially when seeing it for the first time, so I  squirmed, like when I watch Ricky Gervais or Alan Partridge or even Peep show.


http://www.bbc.co.uk/programmes/b00x1tgv
A bit about this episode and a photo of Peter  holding onto a rope and paddle. It is a shame that we ran out of daylight because it is important to show people how to paddle this very manoeuvrable craft. It would have good also to show Peter how to get into it as the first time he tried he went head first into the water.

Here is a link to the programme on BBC iplayer. The BBC only have programmes available for a short period of time, so a month after this was posted it will be too late. I also have no idea if you can watch in other countries.

Here is my previous post on Edwardian Farm

I have a booklet on how to make a coracle, for £7.50, it is a colour book with lots of photos. http://seanhellman.com/woodwork/coracles.php

Thursday, 9 December 2010

Growth rings

Hardwoods and softwoods, how growth rate determines strength.

I find my wood in all sorts of places. I am no purist and have used a lot of recycled wood in my time. Whilst getting some large boxes from a white-goods outlet I also helped myself to some wood in their "free wood" bin, it was 1 inch square by up to 2 foot long and was most probably packing material from wood grown in a cold climate. This is almost perfect; a wee bit small for fan birds but is a dream to use. The feathers can be rived out really thinly, and I am sure that very long feathers would not be a problem either. The right material does make all the difference. Ash and hazel are great but they do give problems with riving feathers as it does take more physical effort and can be tiring. The fan birds I have from Russia are made from a very slow grown softwood, and the craftsmanship is amazing.


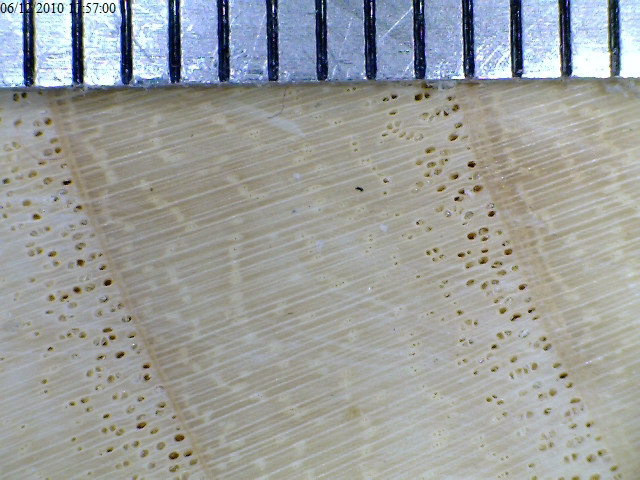
 Recycled pine at about 50 rings per inch


The picture above is taken with my USB microscope, the graduations are 1milimetre apart. We are looking at about 50 annual growth rings to the inch, so if this tree was 10 inch diameter then it would be around 250 years old. At its slowest there are 4 to 5 rings to the millimetre! In England we are lucky to get any softwood with more than 7 rings to the inch. This is because we have a long growing season, we do not get that cold and have reasonably good soils. In this part of the world softwoods are not for fine furniture or other crafts or artefacts; and to do a fine detailed carving from Western Red Cedar or Douglas fir is unheard of, we use them for chainsaw carving. In the states and Canada these woods are used extensively, and they have very different qualities to our wood as they are slow grown. I used to make Native American style flutes and would never use our native woods, it is just not possible, but in the Americas they are superb, their nice tight grain takes the detail very well.


Recycled pine fan bird, from the above wood

Rived feathers before they are fanned out, from ash. All feathers need to be the same thickness.


So, if there is anyone out there that can supply me or point me in the right direction of very slow grown softwoods, as near the Arctic circle or the Baltic regions or even from Canada, I would be a happy person. That is: tangential face planks that are straight-grained and knot free. Other names for the tangential face are flat-sawn, flat-grain, plain-sawn or even slash-sawn.

So in the first picture the darker rings are the latewood and are harder than the early wood growth which is the bit that varies in width depending on how good a growing season was. So the more growth rings to the inch, the higher proportion of late wood rings, and the stronger the wood is. The earlywood is soft and will absorb stain more readily, it also sands away quicker, so you can be left with an undulating surface with the latewood protruding.

In ring-porous hardwood, that is woods such as oak and ash which have large pores concentrated in the early wood and smaller pores in the latewood, the opposite is true. The wider the rings, the stronger the wood. So, do not make chair legs or handles from ash with 15 or more rings to the inch, they can easily be broken. At the APF this year we had for the competition, a load of ash; some of which was very slow grown, more than 15 rings per inch, and making fan birds out of this was easy. The wood was not hard but the more growth ring to the inch the more likely the feathers would snap off when bent. My ideal ash wood is 3 to 6 rings per inch for chair and handle making.

Fast grown English ash at about 3 rings per inch, the earlywood has the large pores


Slow grown English ash at about 20 rings per inch from the APF

I have not been able to find any relationship in diffuse porous woods between rings per inch and strength; that is, in woods that have pores more or less the same size throughout each growth ring. Can anyone enlighten me on this; how do you tell if you have a strong or weak plank of diffuse porous wood?

Tuesday, 16 November 2010

Tapered sliding dovetail bench

  A bench for Garden for George

Some projects just take years. I was approached 3 years ago about making a bench or benches for a garden in memory of George Harrison. The representative and I went through all my designs and finally, a couple of months ago, settled on a design that came from using tapered sliding dovetail joints in a bowl horse. I had never made such a bench, but was comfortable making the joints for green wood work tools. A great joint that can easily be knocked apart, and which gets tighter and firmer when pressure is applied.
Again it was a short lead time and great fun to make. Just before I confirmed that I would make the bench I had to make a pre-prototype-prototype, which is what I call this little stool.

I learnt a lot about this joint made from sawn and planed timber and it took me a long time to figure out how to mark out the legs. Marking out and cutting the mortice is simple, not so with the tenons on the leg, lots of compound angles that made my head hurt. If anyone knows how to figure out these angles mathematically so they can be transferred to the legs then please let me know.My solution is simple, and I suspect it is a way that many of us actually work things out. I made a mdf angle template, for each side of the joint.


 The dovetail joint has a slope of 1in 6 just like a normal dovetail.
After making the little stool, which I really like, even though it was made with the crappiest bits of wood in my shop. It has a solidity and presence that other stools I have made do not. It also has a price tag equal to its weight, not this one, but a similar one you will commission me to make you ; )

The plank for the bench was in the £300 mark - expensive - so I made a prototype from a 4 inch thick oak plank that had woodworm. I also wanted to get the angles of the legs and back right, before committing myself to the expensive plank of wood.

One problem with making the joints for the bench was that the plank of wood did not fit through my planer thicknesser, so it had to be hand planed. I also kept the dome in the top of the wood, to help shed water, but had to get rid of any wind. I did not have the proper planes, or time, to really square the timber off as I would have liked. So each joint was slightly different, I had to make lots of these templates.


The legs are hand-planed down, and had to have lots of fitting to ensure a tight and even fit. The waste was taken off on my band-saw, rather than using one of my ripsaws.
Click on image to embiggen

The bench is going outside in a public place so I also glued the legs in to help with keeping water and eventually rot out of the legs. Most of this bench is made with hand tools and no sandpaper.

It is a simple but elegant bench that takes quite a bit longer to make than its looks suggest.


oak bench, tapered sliding dovetail joints from Sean Hellman on Vimeo.
They also come flat packed, and simpler than Ikea furniture to assemble, that is if you can lift it!

Tuesday, 9 November 2010

Coffin Smoother

Coffin Smoother

My Dad recently gave me a plane of his, a coffin smoother. He is a sculptor mainly working in metal.

I have fallen in love with this old and battered plane and am appreciating its uses and qualities. I am newish to the use of planes, although I have renovated a few metal record planes and old wooden ones. The plank of wood you see in the picture is 4 x 13 inch and 6,1/2 feet long, an inch too wide to fit through my planer thicknesser. Out came the planes, and Dan and I had to take the wind out and level smooth. We both by far preferred the wood planes, they just glided over the wood, light and warm to the touch. This is all very subjective, but these things certainly add to the pleasure of the work in hand.
I have a lot to learn about planes, and I think one of the problems with both these planes is the rather large mouth size. In the larger plane the shavings all bunch up in the throat. I think it is time for an insert to be fitted to reduce the mouth size.

This plank of wood is being made into a bench, the "mortice" joints you see are sliding tapered dovetail joints. The female parts are easy to cut, but the male tenons are not that easy and take a long time to pare down to fit. More about this in a later blog.

Sunday, 7 November 2010

A Little Sculpture

Salmon sculpture

Two months ago I was asked by Eden Design to design and carve a sculpture for Stoke Gabriel Community Orchard. Two months is just not long enough and it certainly put me under a lot of strain, but it was reasonably paid, and local.
Any business will have an order book and sometimes I have been booked up for months ahead, so a two month lead time is often not enough. I have another deadline next week, and have taken far too long to supply some smaller orders than is polite. I do not agree with  Douglas Adams: 'I love deadlines. I like the whooshing sound they make as they fly by.' it disturbs me deeply if I miss them.

Anyway this had to be a last minute project that took over two weeks to make and I was uncertain whether I was going to complete in time. Luckily after the first week, I knew it would be completed and would look good, so the strain receded a bit.

I should have bought a carving bar for my chainsaw, something that has been on my list of tools to buy for sometime. A chain saw was not much used in this, and most work was undertaken with axe, carving adze, gouges and three long handled hook knives - the same ones that I finished Nicola`s box with. These knives are fantastic carving tools but I really also needed a long handled knife as well.


The first time I saw the sculpture as it should be was today at the opening of the new play park. I do not have the means to hoist the sculpture upright in my workshop to see it as it would be when erected in place, so it was with great relief to see that it looked even better in situ. I was also used to looking at it close up all the time, and not being able to get any perspective on it. 

Although the work was co-ordinated by Eden Design, a lot of community input went into it as well, especially with some of the fund raising. The play park was opened by the oldest resident of Stoke Gabriel who was born and still lives in the house opposite. The children rushed in as soon as they could and played with the joy and intensity that only children can.

My very talented friend Isabel, one of the other artists involved,
 made this large apple sculpture