I was on Edwardian Farm, episode 8, this Friday 24th Dec making a coracle. For those of you who have not seen it, it is an ongoing documentary about 3 people who live and work on a farm as they would have done in Edwardian times, 1901 to about 1920.
I spent a very enjoyable 6 hours or so with Alex helping him make a coracle, all of which was filmed. During the day's filming I went into great detail about how to make a coracle, but only a brief overview was shown on the TV. If you just want to see the coracle bit, then it starts about 16 mins in, and finishing it off at 20mins, the coracle being used at about 24 mins. I bought the book the other day and there is a small photo of me in it. Being a person who loves to know how things work or get made, Edwardian Farm has been fascinating for me, both Lucy and I love social history. I wish they had the time to go into far more detail both in the book and series, but I know they need to make an engaging and entertaining program. A program that I would love to see would not appeal so much to the normal BBC2 audience.
I do not like watching myself, especially when seeing it for the first time, so I squirmed, like when I watch Ricky Gervais or Alan Partridge or even Peep show.
http://www.bbc.co.uk/programmes/b00x1tgv
A bit about this episode and a photo of Peter holding onto a rope and paddle. It is a shame that we ran out of daylight because it is important to show people how to paddle this very manoeuvrable craft. It would have good also to show Peter how to get into it as the first time he tried he went head first into the water.
Here is a link to the programme on BBC iplayer. The BBC only have programmes available for a short period of time, so a month after this was posted it will be too late. I also have no idea if you can watch in other countries.
Hardwoods and softwoods, how growth rate determines strength.
I find my wood in all sorts of places. I am no purist and have used a lot of recycled wood in my time. Whilst getting some large boxes from a white-goods outlet I also helped myself to some wood in their "free wood" bin, it was 1 inch square by up to 2 foot long and was most probably packing material from wood grown in a cold climate. This is almost perfect; a wee bit small for fan birds but is a dream to use. The feathers can be rived out really thinly, and I am sure that very long feathers would not be a problem either. The right material does make all the difference. Ash and hazel are great but they do give problems with riving feathers as it does take more physical effort and can be tiring. The fan birds I have from Russia are made from a very slow grown softwood, and the craftsmanship is amazing.
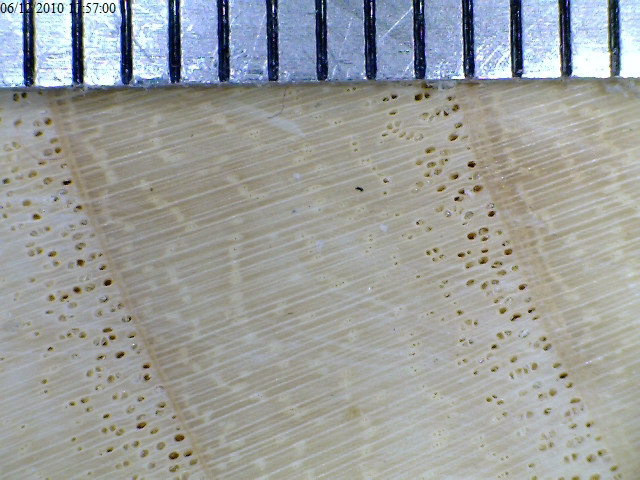
Recycled pine at about 50 rings per inch
The picture above is taken with my USB microscope, the graduations are 1milimetre apart. We are looking at about 50 annual growth rings to the inch, so if this tree was 10 inch diameter then it would be around 250 years old. At its slowest there are 4 to 5 rings to the millimetre! In England we are lucky to get any softwood with more than 7 rings to the inch. This is because we have a long growing season, we do not get that cold and have reasonably good soils. In this part of the world softwoods are not for fine furniture or other crafts or artefacts; and to do a fine detailed carving from Western Red Cedar or Douglas fir is unheard of, we use them for chainsaw carving. In the states and Canada these woods are used extensively, and they have very different qualities to our wood as they are slow grown. I used to make Native American style flutes and would never use our native woods, it is just not possible, but in the Americas they are superb, their nice tight grain takes the detail very well.
Recycled pine fan bird, from the above wood
Rived feathers before they are fanned out, from ash. All feathers need to be the same thickness.
So, if there is anyone out there that can supply me or point me in the right direction of very slow grown softwoods, as near the Arctic circle or the Baltic regions or even from Canada, I would be a happy person. That is: tangential face planks that are straight-grained and knot free. Other names for the tangential face are flat-sawn, flat-grain, plain-sawn or even slash-sawn.
So in the first picture the darker rings are the latewood and are harder than the early wood growth which is the bit that varies in width depending on how good a growing season was. So the more growth rings to the inch, the higher proportion of late wood rings, and the stronger the wood is. The earlywood is soft and will absorb stain more readily, it also sands away quicker, so you can be left with an undulating surface with the latewood protruding.
In ring-porous hardwood, that is woods such as oak and ash which have large pores concentrated in the early wood and smaller pores in the latewood, the opposite is true. The wider the rings, the stronger the wood. So, do not make chair legs or handles from ash with 15 or more rings to the inch, they can easily be broken. At the APF this year we had for the competition, a load of ash; some of which was very slow grown, more than 15 rings per inch, and making fan birds out of this was easy. The wood was not hard but the more growth ring to the inch the more likely the feathers would snap off when bent. My ideal ash wood is 3 to 6 rings per inch for chair and handle making.
Fast grown English ash at about 3 rings per inch, the earlywood has the large pores
Slow grown English ash at about 20 rings per inch from the APF
I have not been able to find any relationship in diffuse porous woods between rings per inch and strength; that is, in woods that have pores more or less the same size throughout each growth ring. Can anyone enlighten me on this; how do you tell if you have a strong or weak plank of diffuse porous wood?
Some projects just take years. I was approached 3 years ago about making a bench or benches for a garden in memory of George Harrison. The representative and I went through all my designs and finally, a couple of months ago, settled on a design that came from using tapered sliding dovetail joints in a bowl horse. I had never made such a bench, but was comfortable making the joints for green wood work tools. A great joint that can easily be knocked apart, and which gets tighter and firmer when pressure is applied.
Again it was a short lead time and great fun to make. Just before I confirmed that I would make the bench I had to make a pre-prototype-prototype, which is what I call this little stool.
I learnt a lot about this joint made from sawn and planed timber and it took me a long time to figure out how to mark out the legs. Marking out and cutting the mortice is simple, not so with the tenons on the leg, lots of compound angles that made my head hurt. If anyone knows how to figure out these angles mathematically so they can be transferred to the legs then please let me know.My solution is simple, and I suspect it is a way that many of us actually work things out. I made a mdf angle template, for each side of the joint.
The dovetail joint has a slope of 1in 6 just like a normal dovetail.
After making the little stool, which I really like, even though it was made with the crappiest bits of wood in my shop. It has a solidity and presence that other stools I have made do not. It also has a price tag equal to its weight, not this one, but a similar one you will commission me to make you ; )
The plank for the bench was in the £300 mark - expensive - so I made a prototype from a 4 inch thick oak plank that had woodworm. I also wanted to get the angles of the legs and back right, before committing myself to the expensive plank of wood.
One problem with making the joints for the bench was that the plank of wood did not fit through my planer thicknesser, so it had to be hand planed. I also kept the dome in the top of the wood, to help shed water, but had to get rid of any wind. I did not have the proper planes, or time, to really square the timber off as I would have liked. So each joint was slightly different, I had to make lots of these templates.
The legs are hand-planed down, and had to have lots of fitting to ensure a tight and even fit. The waste was taken off on my band-saw, rather than using one of my ripsaws.
Click on image to embiggen
The bench is going outside in a public place so I also glued the legs in to help with keeping water and eventually rot out of the legs. Most of this bench is made with hand tools and no sandpaper.
It is a simple but elegant bench that takes quite a bit longer to make than its looks suggest.
My Dad recently gave me a plane of his, a coffin smoother. He is a sculptor mainly working in metal.
I have fallen in love with this old and battered plane and am appreciating its uses and qualities. I am newish to the use of planes, although I have renovated a few metal record planes and old wooden ones. The plank of wood you see in the picture is 4 x 13 inch and 6,1/2 feet long, an inch too wide to fit through my planer thicknesser. Out came the planes, and Dan and I had to take the wind out and level smooth. We both by far preferred the wood planes, they just glided over the wood, light and warm to the touch. This is all very subjective, but these things certainly add to the pleasure of the work in hand.
I have a lot to learn about planes, and I think one of the problems with both these planes is the rather large mouth size. In the larger plane the shavings all bunch up in the throat. I think it is time for an insert to be fitted to reduce the mouth size.
This plank of wood is being made into a bench, the "mortice" joints you see are sliding tapered dovetail joints. The female parts are easy to cut, but the male tenons are not that easy and take a long time to pare down to fit. More about this in a later blog.
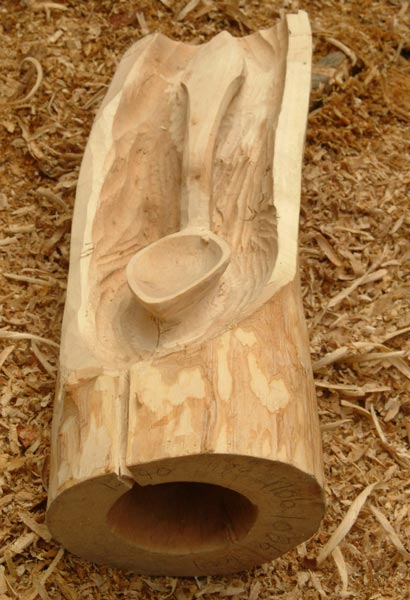
Two months ago I was asked by Eden Design to design and carve a sculpture for Stoke Gabriel Community Orchard. Two months is just not long enough and it certainly put me under a lot of strain, but it was reasonably paid, and local.
Any business will have an order book and sometimes I have been booked up for months ahead, so a two month lead time is often not enough. I have another deadline next week, and have taken far too long to supply some smaller orders than is polite. I do not agree with Douglas Adams: 'I love deadlines. I like the whooshing sound they make as they fly by.' it disturbs me deeply if I miss them.
Anyway this had to be a last minute project that took over two weeks to make and I was uncertain whether I was going to complete in time. Luckily after the first week, I knew it would be completed and would look good, so the strain receded a bit.
I should have bought a carving bar for my chainsaw, something that has been on my list of tools to buy for sometime. A chain saw was not much used in this, and most work was undertaken with axe, carving adze, gouges and three long handled hook knives - the same ones that I finished Nicola`s box with. These knives are fantastic carving tools but I really also needed a long handled knife as well.
The first time I saw the sculpture as it should be was today at the opening of the new play park. I do not have the means to hoist the sculpture upright in my workshop to see it as it would be when erected in place, so it was with great relief to see that it looked even better in situ. I was also used to looking at it close up all the time, and not being able to get any perspective on it.
Although the work was co-ordinated by Eden Design, a lot of community input went into it as well, especially with some of the fund raising. The play park was opened by the oldest resident of Stoke Gabriel who was born and still lives in the house opposite. The children rushed in as soon as they could and played with the joy and intensity that only children can.
My very talented friend Isabel, one of the other artists involved,
made this large apple sculpture
I ran a course at the weekend, making a small 2 brick gas forge and tools. I like a brick forge as it is easily set up and is ready to use within a minute of lighting the gas torch. I am no blacksmith but have made my own tools on and off for over 15 years, often using coke or charcoal. The other advantage of using a gas forge is that it can be set up inside, and very little space is needed.
Before students are allowed to use tool steel they have to practise drawing out a square taper from a 6 inch nail and bending it into a spiral. After this exercise the first tool made was a spoon knife with a gentle curve, the edge was ground into the steel using a bench grinder and belt sander. Once ground it was heated and shaped with the necessary heat treatments to harden and temper it. At the end of day 1 everyone had made their own forge and a hook knife with a handle. Day two consisted of sharpening the knives and making a small carving knife.
I will be running this course again next year, but if you want to make a gas forge then I can send refractory bricks through the post. They are not that heavy and very easy to carve out. I use propane torches from a large gas cylinder, but it is possible to use a cheap all-in-one gas torch with throw away cylinders, they are a bit slower to use, but just make the inside of the forge smaller. MAP gas torches are a lot better but the cartridges are a lot more expensive.
One of the best of the year, that is enjoyment wise, was the Association of Professional Foresters show in Cannock Chase, near Birmingham. This was because a whole group of us from the APT were sponsored by the APF and Buxtons to demonstrate green wood crafts and to compete in the International log-to-leg race.
I went to demonstrate fan birds and Dan also came along. This is the first show that I sold every bird I made during a demonstration as well as most of my stock. The ash supplied for the log races was very good for making the birds.
Why is it that when being watched by other expert green woodworkers my fan birds fail? There was one log or tree in the pile that was very slow grown - if using hardwoods for fan birds avoid the slow grown, it does not work. Gudrun Leitz was watching as I tried and failed to rive this bit of very slow grown ash.
Dan did compete in one of the log to leg races, which I think is amazing considering he had less than half an hour experience on a pole lathe in his life. He was made up when Jim Steele gave him his membership to the APT, which we all 16 of us chipped into. We made him keep the better of his 2 legs and everyone signed it. It was a hard job convincing him to keep it, but us older chaps have often regretted not keeping these milestones in our lives.
We had a great time especially around the fire at night, making new friendships and consolidating old ones. The woodland crafts field was a small oasis in a huge show of big machinery dedicated to cutting and processing of trees often in huge quantities. There were also plenty of other competitions and demonstrations to see. Dan and I did not get much time to have a proper look around.
It was good to meet up with Barn again, still peddling and making lots of spoons .
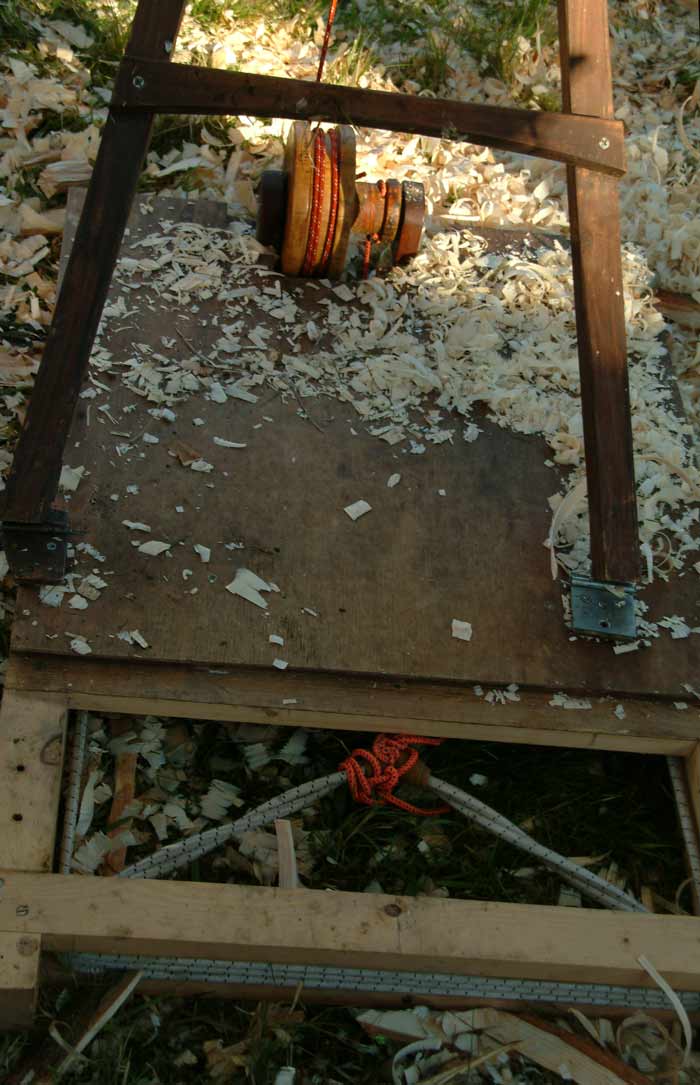
Des had a unique pulley system, as his spring on his pole lathe. I had a go and it was very smooth and just the right tension.
This video is of the log-to-leg race, with Jim Steele entertaining the crowd on the microphone. I filmed Richard Ely, who I had hoped was going to win this year, especially as he came 10 seconds behind Ben Orford at the Bodgers' Ball race in May. We are looking at under 4 minutes per leg from the log, which is very fast. I have never entered a log-to-leg race, but will do next year, I do not do much spindle turning these days. With Dan's enthusiasm and his determination to win a race one day, and being only slightly competitive myself, I am sure my times will improve. I did time myself on one leg and came in at 7 minutes and 30 seconds, but how many penalty points?
This has been a long time in the making, but finally all the papers are signed and I would like to welcome Dan as my new and first apprentice.
Dan and I met at a show one and a half years ago, he wanted to come on workshops or just have some work experience. I was happy to have Dan do simple work for me in the workshop in exchange for me teaching him some green wood skills. Some time later Dan talked about an apprenticeship, that is, an official one where he also went to collage, and we got the ball rolling. I did have doubts, not about Dan, but about money, Health and Safety, commitment of being a full time employer, etc. This has been sorted out, and I have a tidy workshop, where most things have their place with materials and tools easily found.
As an apprentice, Dan will be with me for between 17months and 3 years, and has been reminded often that things are too soft these days with modern apprenticeships. Why indeed should I pay to train and teach a young man a trade? Surely only 3 years is just scraping the surface? Indeed, the young man - nay - child should have been indentured to me at the age of 11 or 12 ! The best one I heard was from Jonty Williams, a man taught and practiced in the husbandry of the land, who showed us a contract for an agricultural labourer apprenticed at the age of 12, for 14 whole years.
The great thing is that Dan knows he has fallen on his feet finding me, and I know that Dan is the dream apprentice, because 16 years old teenagers with his attitude and awareness and a thirst for knowledge do not come my way that often.
So; welcome, Dan, and here is to a long and profitable relationship for us both.
Apart from getting the workshop sorted, we now have a dog. Milo was on the waiting list to go into a rescue home, and is a Staffordshire bull terrier. So for the last couple of months we have had a big change of routine, walking the dog. Milo loves my workshop, so many sticks, I am yet to convince him that I do not just make sticks for him. He could chew a couple of hundred pounds of stock very quickly. He likes Dan and does not mind loud machinery; I am not sure that Dan likes him as much since Milo barked right next to Dan's ear, deafening him.
Recently - shows have been attended and sold at, and much other work produced, so the reason for no posts has been I have been very busy with workshop tidying, work, shows and the dog.
I met a woman at a show last year, and who was born in North Germany. She remembers fan birds from her childhood. I received this email from her the other day explaining the fan bird customs in Germany.
Hi Sean, we've met at the crux fair, where I got exited about the fan birds, if you remember, as I knew them from where I originate (very north of Germany). I told you then I'll find out about the tradition as I'd forgotten parts of it, you said you'd be interested to know. I finally managed to catch up with my father about it, it differs a little from what you've said: Fan birds were common all along the coast of the Baltic Sea, from the border to Denmark in Germany down to the coast of Russia. People used to make them themselves whenever a baby was due in the family. They hung them over the cradle, not only in the house, but also outside, when the cradle stood under a tree. The bird usually moved gently in the wind, however if a person came near and it stopped moving, suddenly stood still, it meant the approaching person had the evil eye and people would take care not to let this person come close to the baby. This is how we know it, hope it's interesting for you. Best wishes Christine.
I love hearing this first-hand tradition and would like to hear more from anyone around the world with their tradition or custom relating to these beautiful wooden birds. As with all traditions and customs they vary so much.
I love making these birds, and I am now selling them wholesale, as I now mastered the crafting of them. This is not to say I have learnt everything there is to know about making them, and I am still developing new styles and designs. As far as I am concerned we do not stop learning until we stop breathing. The first shop to sell them is a National Trust property a few miles away from me in Widecombe on Dartmoor, and hopefully I will get other NT shops interested in Devon as now I am now on their suppliers list.
Above; coloured fan birds
Above; Geese
I have saved my first birds I made and will post pictures of these crude attempts in the near future.This I hope will inspire you to have a go, and after all it is just practice and a enquiring mind; that, and persistence that makes you good at something.
At last I have found a way of making a frame saw where the metal blade holders that hold the saw blade can be rotated. I thought about getting them manufactured, but that would be expensive. Problem solved when I bought very large split pins.
The saw can be used with any band-saw or other types of blade. Cross cutting is easy and bow-saw blades for green wood can be used. With rip sawing just release the tension on the frame and turn the blade 90 degrees around.
Normally I would use 2 hands when ripping, but the camera was in my right hand.
The pins are 10mm diameter 8cm total length. If using very wide blades then a hacksaw will have to be run down the split to widen the gap. I have to do a bit of work on the pins before use, like cutting each side to equal length and drilling a hole through them. I can tell you that drilling the hole is not easy, just as locating the centre punch on round stock accurately is not easy.
I have bought a good quantity of these pins and will be selling them ready to use, with washer and pin to hold the blade in the split pin. The price is £9.50 including postage to UK and Europe only, let me know if you want them posted to the USA and I will get a price for postage. The pins will come with basic instructions, but not a plan or cutting list, the size of your saw will depend on the length of the blades you use. The beauty of frame saws is that you can make them any size or shape you like, depending on the job in hand.
Above is the detail of the joint, a simple mortice and tenon, which holds the cross bar in place.
What about blades? I hear you ask. Old band-saw blades are great, they do not need to be new, so ask any woodworker who uses one to save their old blades for you. They are easy to cut; I just fold them where I want the cut and hit the bend with a hammer on an anvil and unbend the blade, and that's it. Remember to hammer the cut flat, and give it a few strokes with a file. To make a hole use a centre punch and then drill, the metal will be soft enough.
Most band-saw blades are designed for dry wood, so if you are cutting green wood buy some bow saw blades designed for green wood.
Later in the year I will be selling these wholesale, in proper packaging, with full instructions.
Email me if you are interested.
I finished the other willow box (the one which I made too small) with a pure beeswax finish; melting the beeswax until liquid and painting it on the inside which had been warmed with a heat gun. The wax sets quickly and the hot air gun was then used to melt it into the wood. The outside of the box was then waxed and any remaining liquid wax rubbed off; the box was then buffed.
I use the same technique with shrink pots and drinking cups, but if the cups fit into the my wax pot I just leave them to soak, turning them around occasionally.
I like this technique as the wax is soaked into the wood and does not just sit on the surface. Wax inside the shrink pots means that they are food safe and do not smell. Use Danish oil and the smell of the oil takes months to disappear. With my green woodwork items I am wanting to use natural finishes that can be made at home, it is a big subject and I do not have much time to research it at the moment, any recipes are gratefully received.
A hook knife finish can be quicker than other ways of smoothing the surface of wood. As I said in my last post, it is a beautiful textured surface.
This technique is for long handled tools, it can be achieved with a short handled knife, but it will take longer and impose greater strain on the hands and arms. One hand holds the tool near the cutting edge, this hand moves in an arc, back and forth. The other hand holds the handle at the end, and this hand is held against the body so that it acts as a pivot. The process is fast, not like carving the bowl of a spoon out, the hand holding the tool is moving back and forth at speed.
I have been making my own tools for a while, and use a small two brick gas forge. What I like about it is that it is instant, just fire up the gas and 2 minutes latter the forge has properly heated up and I am ready to go.
If you want to learn how to make simple tools and make your own gas forge, I am running a workshop in October in Devon. The emphasis is on doing it all as cheaply as possible, do not worry about not having an anvil, there are ways of using everyday objects to act as an anvil. So if you have a gas torch at home, most of us have a hammer and a few other tools needed, the set up costs are minimal.
Some of the tools below do need longer handles, the longer the handle the greater leverage you have, so it is easier to use. To make and design the right tool can take a few goes. I have just recently found out about the Spear plane or Yariganna, a tool from Japan, this tool is used for and in the same way as I have been using my hook knife. If anyone has any more information or links to websites about using them, please leave a comment.
I have replaced my old website with a new one, which I hope is easier to use and navigate. If you have any problems with it please let me know. I work with a great web designer, Richard Croft, who redid my template and has been teaching me how to put it all together. I am in the process of doing all the boring SEO and hopefully soon there will be a Paypal shopping cart. If by any chance you want to buy anything just email me and I will send you a Paypal invoice, I am also selling Mora knives and Gransfor Bruks axes.
I was asked a while ago to make a box to store bread in. I gave a minimum quote and said I would cleave wood and nail it together. Not any old nails you understand, but nails made from pure natural iron drizzled with the sweat of the blacksmiths. I had a huge lump of rippled willow, which unfortunatly would not cleave very well. I sawed the wood out on my bandsaw and stickered it with weights on to dry out over the weekend. Because the wood was not quite quarter sawn and it wanted to move a bit from internal stresses. I thought it would be best to dovetail it. I have never made a nail in my life and I thought the young lady concerned would not appreciate my sweat drizzled over the nails.
I needed the dovetail practise as I have some apple wood boxes to make later in the year. Believe it or not, I have managed never to make dovetails in my life before.
I also wanted to use my trade mark wooden hinges. Not wanting to rely on glue to hold them onto box and lid I made them dovetailed. The wood for the hinges is English walnut. I did use a bit of glue but, this box can be made with no adhesives at all, just a couple of small dowels through each hinge to stop them sliding out.
Knowing my client prefers a natural finish, I got one of my long handled open sweep hook knives and starting in one corner, went over each side of the box. This was remarkably quick and gives a beautiful textured and tactile finish.
Willow is a lovely wood to use and I highly recommend giving it a go. The hook knife finish also works just as well on other woods, you may have to spend slightly longer on it though.
I was really please with the box, and wanted to make a longer one for our kitchen, but somehow I got the measurements wrong and made the first box 2 cm to small, so no wood left over. The old adage of measure twice and cut once is very true, but does not take into account misreading the measurements in the first place.
Bodgers Ball
Last year I was asked to make a trophy for the spoon class in the annual competition for the Association of Pole Lathe Turners and Green Woodworkers, which takes place at The Bodgers' Ball. This trophy is to commemorate Barry Plant, a member of the Sussex group who died last year.
The Barry Plant trophy is made from Atlas cedar, from a very large tree that died standing in Totnes, Devon. The name plate is from box and slides into a dovetail grove and is then glued. This has been a complicated process; I first made a maquette to show the clients and on their approval, initially got hold of a great piece of field maple for the actual trophy. I part carved this and drilled a large hole in the bottom to relieve the stresses so the wood would not split, and dried it slowly. I weighed it regularly and the weight stabilised - before it split - just two weeks before the show. I had to make another and this had to made from fully seasoned wood, the Atlas cedar.
I used to make didjeridoos from branches of wood and thought it was not possible to find a dry stick or branch which did not have a split in. How wrong I was: when you start looking you can find lots of wood without splits in, even on trees where a branch has died 2-3 years before harvesting. Wood can be a fickle medium, and different species have there own idiosyncrasies.
I know now why the maple split where it did. Notice the hole drilled into the end grain so the wood will dry out evenly from the inside out. I drilled the hole too close to the front and so this was the thinnest point. Next time I will make sure the hole is closer to the back so if any splitting does occur then it will be in the back.
The Bodgers Ball was great fun and met new people and didn't manage to meet people who I know from the Bodgers forum.
I bought a clog makers hollowing tool from Tony Bryant, I have been after one for sometime. I will report back when I get it into working order.
The tool is called a sabotiers gouge or cuillère and is about 18 inches log and 2 inches wide at the spoon end. I was hoping for a smaller one but all his others were even larger. The end is inserted into a handle about 11/2 inches dia and 21/2 feet long. The tool is inserted into a pre-cut socket mid point along the length of the handle.
I met Barns, who walked from Bristol to Reading, making and selling spoons on the way.
Talking to him and sharing spoon carving techniques took me back to when I lived in my teepee many years ago, learning green wood work and living very simply. How we accumulate stuff so easily! I have always said that if I had an aircraft hanger, given a few years I would fill it up. I am a Taurean and I like stuff, it all seems to have value; maybe I can make money from it or it will come in useful some day. I do find it hard to throw out odd bits of wood or short ends, as I do make a lot of small things, and this winter I have been feeling the weight of it all hang round my neck and I long for a simpler way of working.
Anyway - Barns plans on walking around making and selling spoons & sleeping in woods or under the roof of anyone who will put him up. I wish him luck and a great time; a journey such as this must be a wonderful thing to do, a way of learning about the humanity in yourself and others. Maybe one summer I will get a pedlar's licence and a handcart and walk around my local patch making and selling fan birds, and seeing who will put me up for a night. An amazing way of meeting people. I would like to operate far more locally and also get to know my locality more intimately. This would be possible for me for a few weeks but I do have a family, a large workshop and a house to pay rent on. We have had the slow food movement, maybe we need to start the slow craft movement.
There are a lot of local authorities trying to get rid of the Pedlar's License, which will remove the fundamental human right of a person being able to earn a living, even if they have no where to live. Have a look at this entertaining film, which explains the issues. http://gallery.me.com/julianmcdonnell#100154
The web site the film is on has lots of useful information as well.
I also met a local lady who spent some time with me and Barns learning how to make a spoon. She invited me back to her place! To have a look at a cast iron manual morticer that she needed to remove from her shed before she sold her house. It was complete and had all the chisel bits so I then spent the next 2 hours taking the top half off and moving both bits very slowly to the van. It is very very heavy, but where there is a will there is a way. Back at the workshop I sprayed all moving bits with WD40 and it is beginning to move. Has any one used these machines before, any advice or tips?
If you want to find a bit more about the Bodgers' Ball, have a looks at my mates Mark and Robin's blogs.


 l
l


