I finished the other willow box (the one which I made too small) with a pure beeswax finish; melting the beeswax until liquid and painting it on the inside which had been warmed with a heat gun. The wax sets quickly and the hot air gun was then used to melt it into the wood. The outside of the box was then waxed and any remaining liquid wax rubbed off; the box was then buffed.
I use the same technique with shrink pots and drinking cups, but if the cups fit into the my wax pot I just leave them to soak, turning them around occasionally.
I like this technique as the wax is soaked into the wood and does not just sit on the surface. Wax inside the shrink pots means that they are food safe and do not smell. Use Danish oil and the smell of the oil takes months to disappear. With my green woodwork items I am wanting to use natural finishes that can be made at home, it is a big subject and I do not have much time to research it at the moment, any recipes are gratefully received.
A hook knife finish can be quicker than other ways of smoothing the surface of wood. As I said in my last post, it is a beautiful textured surface.
This technique is for long handled tools, it can be achieved with a short handled knife, but it will take longer and impose greater strain on the hands and arms. One hand holds the tool near the cutting edge, this hand moves in an arc, back and forth. The other hand holds the handle at the end, and this hand is held against the body so that it acts as a pivot. The process is fast, not like carving the bowl of a spoon out, the hand holding the tool is moving back and forth at speed.
I have been making my own tools for a while, and use a small two brick gas forge. What I like about it is that it is instant, just fire up the gas and 2 minutes latter the forge has properly heated up and I am ready to go.
If you want to learn how to make simple tools and make your own gas forge, I am running a workshop in October in Devon. The emphasis is on doing it all as cheaply as possible, do not worry about not having an anvil, there are ways of using everyday objects to act as an anvil. So if you have a gas torch at home, most of us have a hammer and a few other tools needed, the set up costs are minimal.
Some of the tools below do need longer handles, the longer the handle the greater leverage you have, so it is easier to use. To make and design the right tool can take a few goes. I have just recently found out about the Spear plane or Yariganna, a tool from Japan, this tool is used for and in the same way as I have been using my hook knife. If anyone has any more information or links to websites about using them, please leave a comment.
I have replaced my old website with a new one, which I hope is easier to use and navigate. If you have any problems with it please let me know. I work with a great web designer, Richard Croft, who redid my template and has been teaching me how to put it all together. I am in the process of doing all the boring SEO and hopefully soon there will be a Paypal shopping cart. If by any chance you want to buy anything just email me and I will send you a Paypal invoice, I am also selling Mora knives and Gransfor Bruks axes.
I was asked a while ago to make a box to store bread in. I gave a minimum quote and said I would cleave wood and nail it together. Not any old nails you understand, but nails made from pure natural iron drizzled with the sweat of the blacksmiths. I had a huge lump of rippled willow, which unfortunatly would not cleave very well. I sawed the wood out on my bandsaw and stickered it with weights on to dry out over the weekend. Because the wood was not quite quarter sawn and it wanted to move a bit from internal stresses. I thought it would be best to dovetail it. I have never made a nail in my life and I thought the young lady concerned would not appreciate my sweat drizzled over the nails.
I needed the dovetail practise as I have some apple wood boxes to make later in the year. Believe it or not, I have managed never to make dovetails in my life before.
I also wanted to use my trade mark wooden hinges. Not wanting to rely on glue to hold them onto box and lid I made them dovetailed. The wood for the hinges is English walnut. I did use a bit of glue but, this box can be made with no adhesives at all, just a couple of small dowels through each hinge to stop them sliding out.
Knowing my client prefers a natural finish, I got one of my long handled open sweep hook knives and starting in one corner, went over each side of the box. This was remarkably quick and gives a beautiful textured and tactile finish.
Willow is a lovely wood to use and I highly recommend giving it a go. The hook knife finish also works just as well on other woods, you may have to spend slightly longer on it though.
I was really please with the box, and wanted to make a longer one for our kitchen, but somehow I got the measurements wrong and made the first box 2 cm to small, so no wood left over. The old adage of measure twice and cut once is very true, but does not take into account misreading the measurements in the first place.
Bodgers Ball
Last year I was asked to make a trophy for the spoon class in the annual competition for the Association of Pole Lathe Turners and Green Woodworkers, which takes place at The Bodgers' Ball. This trophy is to commemorate Barry Plant, a member of the Sussex group who died last year.
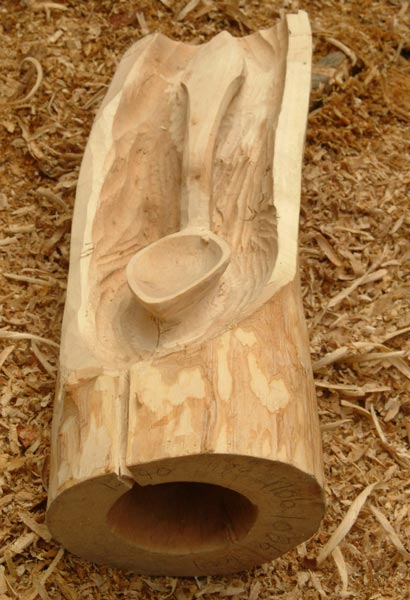
The Barry Plant trophy is made from Atlas cedar, from a very large tree that died standing in Totnes, Devon. The name plate is from box and slides into a dovetail grove and is then glued. This has been a complicated process; I first made a maquette to show the clients and on their approval, initially got hold of a great piece of field maple for the actual trophy. I part carved this and drilled a large hole in the bottom to relieve the stresses so the wood would not split, and dried it slowly. I weighed it regularly and the weight stabilised - before it split - just two weeks before the show. I had to make another and this had to made from fully seasoned wood, the Atlas cedar.
I used to make didjeridoos from branches of wood and thought it was not possible to find a dry stick or branch which did not have a split in. How wrong I was: when you start looking you can find lots of wood without splits in, even on trees where a branch has died 2-3 years before harvesting. Wood can be a fickle medium, and different species have there own idiosyncrasies.
I know now why the maple split where it did. Notice the hole drilled into the end grain so the wood will dry out evenly from the inside out. I drilled the hole too close to the front and so this was the thinnest point. Next time I will make sure the hole is closer to the back so if any splitting does occur then it will be in the back.
The Bodgers Ball was great fun and met new people and didn't manage to meet people who I know from the Bodgers forum.
I bought a clog makers hollowing tool from Tony Bryant, I have been after one for sometime. I will report back when I get it into working order.
The tool is called a sabotiers gouge or cuillère and is about 18 inches log and 2 inches wide at the spoon end. I was hoping for a smaller one but all his others were even larger. The end is inserted into a handle about 11/2 inches dia and 21/2 feet long. The tool is inserted into a pre-cut socket mid point along the length of the handle.
I met Barns, who walked from Bristol to Reading, making and selling spoons on the way.
Talking to him and sharing spoon carving techniques took me back to when I lived in my teepee many years ago, learning green wood work and living very simply. How we accumulate stuff so easily! I have always said that if I had an aircraft hanger, given a few years I would fill it up. I am a Taurean and I like stuff, it all seems to have value; maybe I can make money from it or it will come in useful some day. I do find it hard to throw out odd bits of wood or short ends, as I do make a lot of small things, and this winter I have been feeling the weight of it all hang round my neck and I long for a simpler way of working.
Anyway - Barns plans on walking around making and selling spoons & sleeping in woods or under the roof of anyone who will put him up. I wish him luck and a great time; a journey such as this must be a wonderful thing to do, a way of learning about the humanity in yourself and others. Maybe one summer I will get a pedlar's licence and a handcart and walk around my local patch making and selling fan birds, and seeing who will put me up for a night. An amazing way of meeting people. I would like to operate far more locally and also get to know my locality more intimately. This would be possible for me for a few weeks but I do have a family, a large workshop and a house to pay rent on. We have had the slow food movement, maybe we need to start the slow craft movement.
There are a lot of local authorities trying to get rid of the Pedlar's License, which will remove the fundamental human right of a person being able to earn a living, even if they have no where to live. Have a look at this entertaining film, which explains the issues. http://gallery.me.com/julianmcdonnell#100154
The web site the film is on has lots of useful information as well.
I also met a local lady who spent some time with me and Barns learning how to make a spoon. She invited me back to her place! To have a look at a cast iron manual morticer that she needed to remove from her shed before she sold her house. It was complete and had all the chisel bits so I then spent the next 2 hours taking the top half off and moving both bits very slowly to the van. It is very very heavy, but where there is a will there is a way. Back at the workshop I sprayed all moving bits with WD40 and it is beginning to move. Has any one used these machines before, any advice or tips?
If you want to find a bit more about the Bodgers' Ball, have a looks at my mates Mark and Robin's blogs.
I made this a while ago from London plane burr, a lovely wood to work with, and a very small tight grained burr. I do not usually sand these cups preferring the tooled finish, the wood being highly figured, sanding would only enhance it. The inside is left with a tooled finish.
I have Kuksas for sale, just contact me for details or have a look on my web site, which at the time of publishing is the old site, without kuksas on. New site within the next couple of weeks.
These cups are made with a bandsaw, to cut the blank, axes, chisels and knives both straight and hooked. The finished cup is soaked in a pot of melted raw beeswax, and is perfect for any cold drinks including spirits.




 Posts
Posts


