Saturday, 22 May 2010

Bodgers Ball and Pedlars

Bodgers Ball
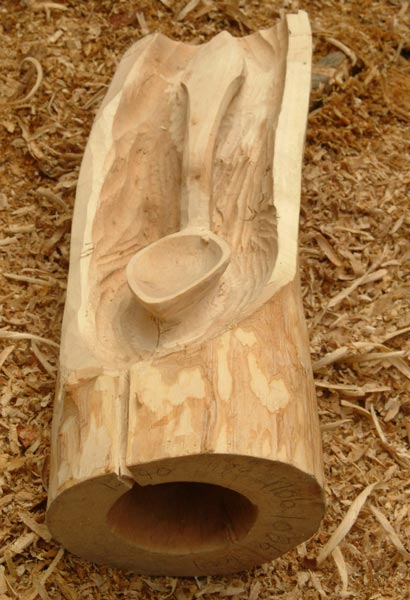
Last year I was asked to make a trophy for the spoon class in the annual competition for the Association of Pole Lathe Turners and Green Woodworkers, which takes place at The Bodgers' Ball. This trophy is to commemorate Barry Plant, a member of the Sussex group who died last year.
The Barry Plant trophy is made from Atlas cedar, from a very large tree that died standing in Totnes, Devon. The name plate is from box and slides into a dovetail grove and is then glued. This has been a complicated process; I first made a maquette to show the clients and on their approval, initially got hold of a great piece of field maple for the actual trophy. I part carved this and drilled a large hole in the bottom to relieve the stresses so the wood would not split, and dried it slowly. I weighed it regularly and the weight stabilised - before it split - just two weeks before the show. I had to make another and this had to made from fully seasoned wood, the Atlas cedar.

I used to make didjeridoos from branches of wood and thought it was not possible to find a dry stick or branch which did not have a split in. How wrong I was: when you start looking you can find lots of wood without splits in, even on trees where a branch has died 2-3 years before harvesting. Wood can be a fickle medium, and different species have there own idiosyncrasies.
 I know now why the maple split where it did. Notice the hole drilled into the end grain so the wood will dry out evenly from the inside out. I drilled the hole too close to the front and so this was the thinnest point. Next time I will make sure the hole is closer to the back so if any splitting does occur then it will be in the back.

The Bodgers Ball was great fun and met new people and didn't manage to meet people who I know from the Bodgers forum.
I bought a clog makers hollowing tool from Tony Bryant, I have been after one for sometime. I will report back when I get it into working order.

The tool is called a sabotiers gouge or cuillère and is about 18 inches log and 2 inches wide at the spoon end. I was hoping for a smaller one but all his others were even larger. The end is inserted into a handle about 11/2 inches  dia and 21/2 feet long. The tool is inserted into a pre-cut socket mid point along the length of the handle.


I met Barns, who walked from Bristol  to Reading, making and selling spoons on the way.

Talking to him and sharing spoon carving techniques took me back to when I lived in my teepee many years ago, learning green wood work and living very simply. How we accumulate stuff so easily! I have always said that if I had an aircraft hanger, given a few years I would fill it up. I am a Taurean and I like stuff, it all seems to have value; maybe I can make money from it or it will come in useful some day. I do find it hard to throw out odd bits of wood or short ends, as I do make a lot of small things, and this winter I have been feeling the weight of it all hang round my neck and I long for a simpler way of working.
Anyway - Barns plans on walking around making and selling spoons & sleeping in woods or under the roof of anyone who will put him up. I wish him luck and a great time; a journey such as this must be a wonderful thing to do, a way of learning about the humanity in yourself and others. Maybe one summer I will get a pedlar's licence and a handcart and walk around my local patch making and selling fan birds, and seeing who will put me up for a night. An amazing way of meeting people. I would like to operate far more locally and also get to know my locality more intimately.  This would be possible for me for a few weeks but I do have a family, a large workshop and a house to pay rent on. We have had the slow food movement, maybe we need to start the slow craft movement.


There are a lot of local authorities trying to get rid of the Pedlar's License, which will remove the fundamental human right of a person being able to earn a living, even if they have no where to live. Have a look at this entertaining film, which explains the issues.
http://gallery.me.com/julianmcdonnell#100154
The web site the film is on has lots of useful information as well.


I also met a local lady who spent some time with me and Barns learning how to make a spoon. She invited me back to her place! To have a look at a cast iron manual morticer that she needed to remove from her shed before she sold her house. It was complete and had all the chisel bits so I then spent the next 2 hours taking the top half off and moving both bits very slowly to the van. It is very very heavy, but where there is a will there is a way. Back at the workshop I sprayed all moving bits with WD40 and it is beginning to move. Has any one used these machines before, any advice or tips?


If you want to find a bit more about the Bodgers' Ball, have a looks at my mates Mark and Robin's blogs.

Sunday, 16 May 2010

Drinking cup, Kuksa made from London plane burr

Drinking cup

I made this a while ago from London plane burr, a lovely wood to work with, and a very small tight grained burr. I do not usually sand these cups preferring the tooled finish, the wood being highly figured, sanding would only enhance it. The inside is left with a tooled finish.

I have Kuksas for sale, just contact me for details or have a look on my web site, which at the time of publishing is the old site, without kuksas on. New site within the next couple of weeks.
These cups are made with a bandsaw, to cut the blank, axes, chisels and knives both straight and hooked. The finished cup is soaked in a pot of melted raw beeswax, and is perfect for any cold drinks including spirits.

Sunday, 25 April 2010

Tapered sliding dovetail joint, tree trail signs

Tree trail signs

I have been commissioned to make signs for a tree trail, so I thought I would make them stand out a bit by not just nailing a plank onto a stick. No metal has been used to hold these signs together, they rely on a dovetail joint.
The wood came from the forest the signs are going into, larch for the posts and Douglas fir for the arrow. I would have liked to have split the wood out of the logs, but in my experience softwood grown in this part of the world does not cleave. A chainsaw was used to rip the logs into quarters.
A dovetail notch was cut an inch or so deep into the post. This was done with an electric chainsaw, with the waste in the middle chiselled out.
The arrow part is just over two inches thick and the joint is chain sawed out, and tidied up with my GB carving axe and a flat chisel. The edges are tidied up with an axe. I did put the face of the arrow onto my jointer (planer) to flatten and smooth it. This is because of the Trend letter template I use to route the letters into the wood.


Fitting the two parts together does not take very long at all, just a bit of shaving with an axe and chisel, and a couple of trial fits. A small hole was bored through the post and arrow from the back and an oak dowel driven through so the sign cannot be taken off.
I wonder how many people will notice how they are made.

This idea came from the European dovetail joint, which I first saw on the Bodgers forum. This is a fantastic joint, which I will be using far more often. Its joy comes from it being self tightening and also it is quick and simple to knock apart, unlike a round mortice and tenon, which can lock tight.


 Above is a photo of my bowl lathe made with the tapered dovetail joint, and below is the leg taken out. All that is needed to make this joint is a chisel and axe, although a saw will speed things up.
I have used an inch-and-something diameter augers to bore holes into my chopping blocks, benches etc.,but sometimes when I need to take them apart for storage or transport, the tenon leg gets stuck in the hole, especially at the end of a show when packing up the van. The round mortice and tenon is great for fixed joints, but not so clever for joints that need quick dismantling.


Monday, 19 April 2010

Rip sawing

Rip Saw

Today I sawed my first plank of wood with a saw I refurbished myself, again bought for a couple of quid and in a rusty condition. This saw is a rip saw, made for cutting along the grain.

The saw blade is 26 inches long and the willow I cut was 9 inches wide, it did take a while to cut. The plank also got a little thin at the bottom end and it is difficult to work out why. Was it my technique or was it because of the how I set and sharpened the saw? I did change the sides I sawed on now and again, and a slight bow across the cut can be seen. For a saw only 26 inches long I think sawing through a 9 inch plank could be a bit too much.

Detail of the rip saw teeth

I have nearly got a full complement of saws, and will never have to buy another plastic handled hard point saw again. There is something very satisfying about being able to set and sharpen my own saws, a self reliance which is empowering.
The old saying goes that the blacksmith is the king of all trades; this is because they are the tool makers. I would love to be able to make my own saw one day, but then again I will have to learn the craft of making files as well.
Here is a video of a craftsman making a saw in Japan. 
If  you have an interest in Japanese tool making do watch the other videos Noko, Kanna and Genno.

This link was posted on the Bodgers forum, by Dave Budd. If you have an interest in green woodwork, you will love this forum.

Thursday, 8 April 2010

Scots pine and fan birds

Scots pine

I now have a year's source of wood for making fan birds - actually, it is probably more than ayears worth - it depends on how many I make and how many workshops I run.
The Forestry Commission at Haldon, Exeter let me have a Scots Pine tree. Ian Parsons (one of the rangers) and I choose the tree, straight grained and slow grown. This particular area was planted with Scots pine, and unfortunately the soil is not good so the trees never grew very fast, and do not have any real commercial value. They were planted in 1926ish, the biggest trees are about 14 inch diameter and the smallest are 5 to 6 inch diameter.


I like Scots pine, a native to this country; and not too resinous, unlike some of the other softwoods. It works very well green or dry and I have made small spoons from it in the past. I will also give it a go on the pole lathe and see if it makes a decent bowl.


The tree was felled at about 9.30am and by 11 am I had made my first fan bird from it. Some woods need to be mellowed or dried out a bit before use, but not this one.

I think this one tree could potentially make around 400 fan birds, and at an average of £20 each - that is good value from a tree that has a commercial value of £0 to £2 a cubic foot. It is interesting that for a maker, one tree might yield so much potential income.
Before you start rushing out booking onto my courses or just learning how to make fan birds, so you can make your fortune, there are a few things to remember. It is fine to make a whole batch of items but then you will need to sell them and that takes time and money. A certain amount of the stock can and will get damaged, especially with fan birds; and some will just fail as you make them - but that can be less with the more experience you have. Then there's all the fixed costs: workshop rent, insurance, van, etc. And the value of the time that it takes.

I would be interested in how other people can add value to trees. Unfortunately it is not the grower who gets much money for the wood as our forestry industry is depressed. The green woodworker is not a great consumer of wood and can make a little go quite a long way. We also can use wood that would be considered fire wood, thereby adding value to it. However, a lot of foresters do not really want to sell odd bits of wood to the occasional green woody: they want to sell it by the lorry load.